Showing posts with label cotton. Show all posts

Friday, 9 September 2016

Sewing - Simplicity 1458 Amazing Fit Dress

Simplicity are running a bloggers' challenge; there are four patterns and five categories in which sewists can participate.

I requested the patterns in the "newcomer" and "dressmaker" categories, in the hope that I would be able to make at least one of those successfully. I went back and checked the rules and realised that I've actually been sewing for too long to be considered a beginner! Oh well, I'm still going to make that skirt!

Aside from the excellent service I've received from Simplicity, I also find the patterns in both the New Look and Simplicity ranges to be easy to follow. I love the fact that the pattern sizes are stacked because it allows me to trace a pattern in one size at the waist, and taper out to a larger size at the hips, since I'm very much a pear shape! I didn't need to do that for this dress, though, as it comes with an option for a "curvy" bottom half!

In the dressmaker category the pattern is 1458 - Amazing Fit Dress.

Dresses


I decided that I wanted something which would look interesting and fun, something I could wear to the office or to a nice event. Looking at the shapes in the pattern, I thought that using a contrast colour for the side panels could look really interesting, though it would mean that my seams would need to be matched up well! I chose pink and black because I like those colours (you might have guessed that, if you've seen my other makes!)

This has been an excellent learning project for me, as it's encompassed several firsts. I inserted my first genuinely invisible zip, I under-stitched my facings for the first time, and I used the blind hem foot to do the hem for the first time.

Dresses
Sorry about the weird pose, I was sinking into the grass with those heels!

The fitting instructions in the patterns were very helpful, and allowed me to reduce the excess fabric both above and below my bust (I'm apparently a funny shape). I also took away a little more excess through the side seams to fit a little better at my waist/hip, tapering out to the bottom of the skirt.

I'm really pleased with the dress, I look forward to wearing it!

With hindsight, I may have made it a little more fitted across the waist/back than the pattern calls for, but with my shapewear underneath that won't be a problem.

I don't know whether I'll make another of these. The neckline is a bit higher than I would normally choose in a dress, but it does look great on. I've made this one quite fitted, so I could try a lighter or stretchier fabric and a less close fit. The option for sleeves is appealing as the autumn starts to make itself felt. The great thing about making your own clothes is that you can choose whether to make them fit closer, and exactly where to make the fit closer.

Dresses

Tuesday, 30 August 2016

Sewing - Simplicity 1418 - Dress

Simplicity 1418 Dress with bodice options

I sewed this dress as part of an outfit-along. It goes with the Saffire shrug I knitted. However, I didn't take any decent photos when I wore it, and so I had to wait until the next opportunity to wear it and take photos!

The pattern is a nice one, where you can mix-and-match to get the bodice that you want. I'd never made anything with pleats in the skirt either, so that was a nice new challenge for me.

Dresses

Modifications:
I didn't use bias binding on the edges, I faced them instead. A bit of a pain, but it looks good. I did this because I couldn't find a binding to match the dress fabric and I didn't want to make my own.
I also fitted the zip a bit differently and put a hook-and-eye at the top.

Things I'd change:
I would do the zip as written! I find it uncomfortable under my arm there. I'd also do an actual concealed zip, which I didn't know how to do at the time.
I'd love to try this in a knit fabric, I think it could be lovely. Then I would omit the zip entirely.
Also, I've lost weight since I wore this first time around, so I might have to take it in a little around the bust. I think it still looks pretty nice though.

Now I've got it out and tried it on again, I plan to both wear this one again, and hopefully make another, maybe even in a smaller size! 

Dresses

Tuesday, 16 August 2016

Sewing - Overnight Duffel

I little while ago I signed up to go on a yoga retreat, and I've been looking forward to it. But, looking at my various luggage options there wasn't anything which made me think "yoga retreat" or that would be the sort of size/style I wanted.
I browsed Pinterest (here's my yoga retreat pinterest board) for some ideas, and I thought that the Overnight Duffel from The Stitching Scientist was a good fit.

Once I had decided that this was the bag for me, I had to find some appropriate fabric. I wanted something hardwearing, but also attractive. After a brief search I found this lovely Rose and Hubble Paris inspired fabric at my favourite online fabric store, Remnant House. I also picked up a nice cotton for the contrast and lining.

Supplies

I then began my search for all the other bits I needed. I knew I wanted a zip which would open in the middle, a must for a bag like this if you ask me. I also wanted to add a shoulder strap to the bag as I'm often carrying or holding hands with a toddler and cross-body bags rock for that. This meant that I needed some extra hardwear, specifically a strap adjuster, D-rings, and clip ends for the strap. On the advice of my knitting/sewing online friends on Ravelry, I also got some fuseable fleece for the main bag, and some medium-weight fuseable interfacing.

I printed out the pattern, but I ended up with pieces which just didn't look big enough. So, instead of trying to re-print them (given the difference could be US Letter paper vs A4, or my printer, or the PDF scaling, or a number of other issues) I decided I would simply create my own pieces, but then follow the instructions. The main difference in doing this is that I have redrawn the ends as rectangles with semi-circles on top (for ease of maths) rather than ovals. This also means that the pockets are square. I did a bit of maths to ensure that all my pieces would fit on the fabric, and worked out a layout to cut the pieces.

The two-ended zip that I bought was an X zip - so when you open it the sliders come from either end.

Zip conversion from X to O

However, I wanted them to come from the middle, so I followed Thread Riding Hood's tutorial to do just that.

Zip conversion from X to O

The other main thing I did differently was when inserting the zip. As written, the pattern suggests sewing the main body inside and outside pieces together, then turning them, then inserting the zip between them. However, this would still leave the bare edge of the zip visible inside the bag.
I simply sewed the zip in at the same time as making the top seam of the pieces. This was a little tricky because it meant that when sewing the other side seams of these pieces, I had to fold and pin the other half of the bag sides out of the way. I think it was worth it though.

Bag

Making the shoulder strap has been quite a learning experience. It's important to attach the hardware in the right order. As the swivel-clips don't have a gap to thread the strap through, these have to be inserted and sewn on. The strap adjuster also needs to be sewn on, with the end of the strap looping around the middle bar of the adjuster. I think it works well, but in future I will consider webbing for the straps.

Bag

Verdict

The pattern is nicely written, and if I'd followed it exactly I would still have got a great bag. My modifications just personalise it a little bit.

Adding fuseable fleece was a great idea, it makes the bag seem quite luxurious! I did fleece and medium interfacing on the bottom piece for extra strength, and I'm pleased I did that too.

I might make another of these bags, though if I do I'd consider making it a bit bigger to hold a weekend worth of clothes for everyone. It's been a nice introduction to making bags though, with no interior zips to worry about or strange fastenings.

I especially like the interior finishing, achieved effectively by sewing all the lining pieces to their outers before construction of the bag. I think if one wanted to add more pockets this method of construction would lend itself to doing so quite efficiently. I liked the canvas, but I found it quite hard to sew. Even with my walking foot it wasn't always feeding through evenly with the cotton. This would probably be less of a problem if both fabrics had been craft cotton.

Bag
Fitting the ends into the tube made by the bottom and sides wasn't easy either, partly due to some fit issues I had (the base wasn't quite wide enough, I think because of the conversion from oval to D shaped end.

I also had to think about placement of the tabs for the D-rings, Attaching these had to be done after the end pieces had been assembled, which was made harder by the fact that I wanted to sew them below the top of the pockets.

I'm looking forward to giving this bag its first outing at the Yoga retreat. I just wish I'd made it big enough to hold my Yoga mat too! Oh well. Maybe next time...


Tuesday, 31 May 2016

Sewing - Simplicity 6483 - 1 hour top

When my copy of Sew Magazine arrived earlier in the month, it had a one-hour top pattern with it. I couldn't resist, and though it took me more like 4 hours all together, I'm pretty pleased with the result.

Pattern: Simplicity 6483, view D
I had just enough of this lovely blue fabric to cut out all of the pieces, though the neck facings weren't cut on the grain as they were meant to be.

Modifications and adjustments
I didn't make any. I made the size 16 as written. With hindsight, I think that was the wrong choice, as I have some gaping issues around the arms,  and there feels like there is a lot of fabric in the back.

 
When I make this again (and I do intend to make another) I might make a smaller size and adjust for the bust. We will see. I think taking more measurements of myself, and of the garment I have finished, might help me to make that decision.

Tuesday, 19 April 2016

Sewing - Reversible Bucket Hats!

Toddler Pattern: Free Download from the Oliver & S site
Adult Pattern: Kitsch Bitsch

Adjustments and alterations: Both patterns use basically the same method to put the hats together, with a couple of small exceptions. The toddler hat has two pieces each for the side and brim, which you are to cut out and then tape together. The Kitsch hat simply has you cut that piece on the fold, so you only need one half. If (like me) you're always looking to save paper and ink, then only print the crown and one each of the side and brim pieces, and then cut them on the fold.

Toddler Hat
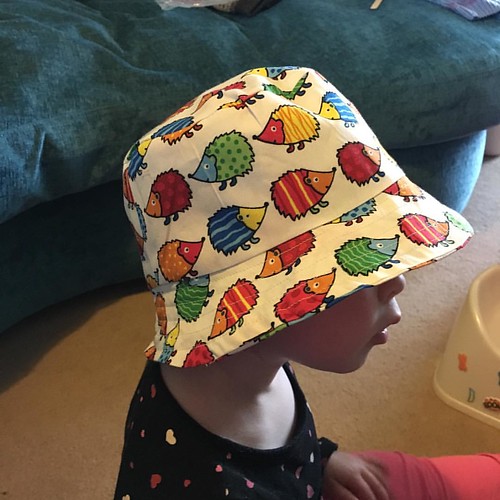
I've made this hat for my little girl before. Last summer I found some cute dinosaur fabric, and I couldn't resist making her some hats from it. This summer I bought some hedgehog fabric (which is meant to be a bean-bag!) and when I decided that she needed a hat, I knew I wanted to use this fabric. It's pretty firm, so I didn't interface any of it. I basically followed the directions from the Kitsch hat to put the pieces together, still trimming the seam allowances to ¼" after sewing. I still top-stitched around the crown, and I did some top-stitching on the brim too.

Viola! A cute hedgehog bucket hat!

#naptime #sewing #hat @oliverands #buckethat I think she likes it!

Verdict (Toddler hat):
It's really cute! Because I'd accidentally printed at 106% I've made the smallest size. It worked well for my 22 month old. It's probably not really reversible though, because I cut out the inside pieces upside-down!

Adult Hat
I had some denim left over from the jacket I've been making, and I need a hat for my holiday, so I thought I'd have a go at making myself a bucket hat. I love the way they look, but they never fit me especially well. To get a good fit, I made the "inside" hat first. That way I could make adjustments to the size of everything one the easier-to-sew cotton. Because the denim is pretty firm, I decided not to interface the brim.

Once I'd stitched the hats together, and turned them the right way in, I did a little more stitching on the adult hat than called for. I did one line of top-stitching around the crown, to help keep the two parts together, and one round of top stitching on the brim.

Despite trying on the lining, and even at the time thinking "hm, this seems a little roomy", when I tried the hat on it was too big.

Bit big? #kitschbitsch #buckethat #sewing

So, I took it apart and re-made it. If I'd had more of the denim, I'd have considered just starting fresh. The main thing I did was switch to the smaller pattern size. I also reduced the height of the sides by about ½". I didn't top-stitch around the crown this time, but I did several concentric rows of stitching on the brim which gives it a bit more firmness.

Much better! #sewing #buckethat #kitschbitsch #reconstructed - now I just need to top stitch the brim and it's done!

Viola! a reversible bucket hat for my holiday!

Verdict (Adult hat):
I like it. I think the pattern as written might be a little tall for my liking, but because there isn't a square to confirm my sizing, it is possible that I simply printed it too big. That would explain why the small has been the right size when I thought it would be too small.

Untitled

Wednesday, 21 October 2015

Crochet - Basic Beanie

I made a hat! #crochet #crocheting #crochetersofinstagramPattern: Basic Beanie
Yarn: King Cole Bamboo
Hook: 4.5mm
Size Made: Toddler

Mods: I only made 13 rounds. I then finished with a basic shell edging as follows:

*skip 2tr, ch1 (tr, ch1) five times into next tr, skip 2tr, sl into next tr* repeat all around.

Verdict: This is a really simple, really cute hat! I think I probably should have used a 4mm hook for this yarn, but since it's an autumn hat the slightly lacy effect is fine. I'll probably use this pattern again.