Friday, 2 December 2016

Knitting - Marianna's Toddler Mitts

Pattern: Marianna's Toddler Mitts
Yarn: Fyberspates Space Dyed Sock Yarn, Fiesta, 1 skein (approx 328 yards) - I used less than a quarter of the skein.
Needle: 4mm

I don't generally like knitting flat, but these little mittens were a nice quick knit!

Toddler mitts

Modifications:
I knitted an extra two rows before starting the thumb shaping, an extra two rows in the thumb. and an extra two rows in the palm before decreasing

Verdict:

These are very cute, but they only just fit my 2 year old even with my adjustments. She has quite long fingers I guess!

Wednesday, 16 November 2016

Knitting - Lady's Work Mittens by Sarah Bradberry

Pattern: Lady's Work Mittens by Sarah Bradberry
Yarn: Fyberspates Space Dyed Sock Yarn, Fiesta, 1 skein (approx 328 yards) - I used less than half the skein.
Needle: 3.5mm and 4mm

This yarn was part of a multi-buy I picked up ages ago, but then sold on in a destash to a friend of mine. That friend has sadly died and when her fiance was sorting out her stash I reclaimed it. The start of the yarn was a bit kinky, as though she'd already started something with it, but then re-wound it.
Anyway, the weather got cold here, and I had no mittens. I have some gloves, but I've been meaning to make myself some mittens for a while. I've always wanted some flip-top mittens!

Ladies work mittens

Modifications and Adjustments:
  • I didn't cast off at the gap, I moved the stitches onto a holder. I then did a provisional cast-on for the other side of the gap. Then I was able to pick up the live stitches to work the ribbing.
  • I only picked up 19 stitches (not 20) for the ribbing, so that I could have both ends worked as knit on the outside, to make it look neater.
  • I also did provisional cast on for the extra stitches for the thumb.
  • I worked an extra round of decreases on the fingers, giving me a little bit more length.
  • I ignored the number of rows for the thumb and just knitted til they were long enough.
  • I made the mittens two-at-a-time
Verdict:
I'm really pleased with these. My little girl has asked for some, though I think I'll make her just regular mittens if I do. They fit me really nicely, which is unusual as I normally make mittens for myself too small and end up giving them away!

Ladies work mittens

Tuesday, 25 October 2016

Sewing - New Look 6242

New Look 6242 Misses corset top with variations, Wide leg pants or full skirt

I like dressing up, and I like making my own costumes. We were invited to a 1980s themed fancy dress party and having looked at my options I decided that I was going to be the Princess of Power! But then I found out that the birthday girl was going to be She-Ra, so I switched out to Tinkerbell.

Fortunately I could still use the same corset pattern, just adding a skirt part to it as part of the construction. This posed a few challenges, as did my choice of fabric, a shiny top-layer to the dress over poly-cotton and a cotton lining.

The shiny top-fabric was very challenging to work with, it split easily, and frayed badly. It also pulled threads very easily when sewing (I should probably have switched out to a sharper needle). I also had some trouble with the invisible zip, due to the splitty fabric. It worked out fine in the end though.

The New Look pattern was well written though, I knew exactly what it wanted me to do at each stage. Since this was my first time boning a corset I appreciated the detailed instructions. I traced off the corset patterns and then lengthened them all based on the waist-line to skirt length. I left the bottom of the skirt straight to begin with.

Once I'd sewn everything together, I drew a zig-zag hem on the bottom, sewed that, and then trimmed off the excess fabric so that the points could be pressed out.

One set of inexpensive wings and some sparkly shoes later, and viola!

Tinkerbell

Modifications

Other than lengthening the pattern pieces and then adding the zig-zag edging, the only major modification I made was that I did boning on the front center, front side, and side panels, and put the zip in the back. I understand why the pattern has it in the side though. I also ended up putting a dart in the top of both side panels so that the dress sat flush with my chest instead of sticking out. If I had made a muslin I would have known to reduce the side panels accordingly.

If I were to make it again

I don't like the shape of the front center piece, I'm not sure if it was my wonky sewing though! It seemed to bow upwards rather than running straight across.

I think I could make this pattern again quite happily, though I don't have a lot of call for wearing corsets these days! I might make the She-Ra version I was planning, as I could wear it to York Comicon next year.


Tinkerbell

Friday, 21 October 2016

Knitting - Hubby's giant yellow scarf

Pattern: Made up as I went
Yarn: Home Farm Wensleydales "Big Wool" in Amber
Needle: 9mm
Size: About 8" wide and 6+ feet

What I did:
Hubby requested a chunky scarf to go with his navy overcoat for winter, and said he was open to having an interesting colour. I found the Home Farm Wensleydales stand at the British Wool show in York, and they had the perfect chunky yarn in the perfect yellow.

Amber scarf

We browsed for a pattern which he liked, but most of the patterns he chose were for lighter weight yarns, so I took those as inspiration and charted a 6-strand cable. After I knitted the first repeat I got hubby's feedback, and he was concerned it was too wide. So, I started again with a narrower cable, a bit more garter stitch, and a nice fast knit!

I realised quite early on that the three balls of yarn wouldn't be enough for the length of scarf that I wanted, so I got in touch with the owner of HFW who confirmed that they had some of the same dyelot left, and that she'd be happy to send me some. Resisting the temptation to buy lots more of their yarn (it's seriously scrumptious!) I ordered just one more ball.

Amber scarf

Verdict: I love it. He loves it. It's going to be super warm!

If you like this pattern, it's available in my Ravelry Store.

Sunday, 11 September 2016

Knitting - Gradient Socks

Pattern: Basic sock pattern, twisted rib cuff, genuine afterthought heel.
Yarn: My hand-dyed gradient 4ply, approx 100g.
Needle: 2.5mm

After I dyed the gradient red/cream sock yarn, I couldn't wait to start knitting with it! So, I dug out a pair of 2.5mm circulars out, and cast on! I decided to put the darker red at the bottom as it would hopefully hold up better to wear and general grubbiness that socks have to deal with.

This was the first time I have done an actual afterthought heel. Normally I leave a line of contrasting yarn where I intend to put the heel, but as I didn't know exactly how long I was going to knit these socks (I wanted to use the whole gradient!) I had to do it properly.
Once I had finished the main sock body, I decided where the heel needed to be based on that.

Gradient socks

Since I'm a bit of a stickler for my socks matching, I counted the number of rows so that I could replicate it for the second sock.

Yarn Harlot describes how to do the afterthought heel much more eloquently than I could.

And there you go. Gradient socks, uninterrupted gradient, genuinely afterthought heel.

Gradient socks

A note about afterthought heels
Afterthought heels are especially useful if you want to preserve a stripe sequence or colour flow. Normally if you work a heel in a self-striping yarn as part of the knitting of the body of the sock you get an interruption to the stripes where the heel takes up some of the stripes. You can see this on the below picture where the brown stripes narrow over the top of the foot where the heel has been worked.

More Brown Socks

So, to avoid this, if you knit the heel afterwards you can be sure to preserve the stripes. The other way is to stop at the end of a stripe, knit the heel and then wind off the yarn to the next sensible place to start once the heel is done. This seems wasteful to me, and wouldn't work on a gradient like this.

Friday, 9 September 2016

Sewing - Simplicity 1458 Amazing Fit Dress

Simplicity are running a bloggers' challenge; there are four patterns and five categories in which sewists can participate.

I requested the patterns in the "newcomer" and "dressmaker" categories, in the hope that I would be able to make at least one of those successfully. I went back and checked the rules and realised that I've actually been sewing for too long to be considered a beginner! Oh well, I'm still going to make that skirt!

Aside from the excellent service I've received from Simplicity, I also find the patterns in both the New Look and Simplicity ranges to be easy to follow. I love the fact that the pattern sizes are stacked because it allows me to trace a pattern in one size at the waist, and taper out to a larger size at the hips, since I'm very much a pear shape! I didn't need to do that for this dress, though, as it comes with an option for a "curvy" bottom half!

In the dressmaker category the pattern is 1458 - Amazing Fit Dress.

Dresses


I decided that I wanted something which would look interesting and fun, something I could wear to the office or to a nice event. Looking at the shapes in the pattern, I thought that using a contrast colour for the side panels could look really interesting, though it would mean that my seams would need to be matched up well! I chose pink and black because I like those colours (you might have guessed that, if you've seen my other makes!)

This has been an excellent learning project for me, as it's encompassed several firsts. I inserted my first genuinely invisible zip, I under-stitched my facings for the first time, and I used the blind hem foot to do the hem for the first time.

Dresses
Sorry about the weird pose, I was sinking into the grass with those heels!

The fitting instructions in the patterns were very helpful, and allowed me to reduce the excess fabric both above and below my bust (I'm apparently a funny shape). I also took away a little more excess through the side seams to fit a little better at my waist/hip, tapering out to the bottom of the skirt.

I'm really pleased with the dress, I look forward to wearing it!

With hindsight, I may have made it a little more fitted across the waist/back than the pattern calls for, but with my shapewear underneath that won't be a problem.

I don't know whether I'll make another of these. The neckline is a bit higher than I would normally choose in a dress, but it does look great on. I've made this one quite fitted, so I could try a lighter or stretchier fabric and a less close fit. The option for sleeves is appealing as the autumn starts to make itself felt. The great thing about making your own clothes is that you can choose whether to make them fit closer, and exactly where to make the fit closer.

Dresses

Tuesday, 30 August 2016

Sewing - Simplicity 1418 - Dress

Simplicity 1418 Dress with bodice options

I sewed this dress as part of an outfit-along. It goes with the Saffire shrug I knitted. However, I didn't take any decent photos when I wore it, and so I had to wait until the next opportunity to wear it and take photos!

The pattern is a nice one, where you can mix-and-match to get the bodice that you want. I'd never made anything with pleats in the skirt either, so that was a nice new challenge for me.

Dresses

Modifications:
I didn't use bias binding on the edges, I faced them instead. A bit of a pain, but it looks good. I did this because I couldn't find a binding to match the dress fabric and I didn't want to make my own.
I also fitted the zip a bit differently and put a hook-and-eye at the top.

Things I'd change:
I would do the zip as written! I find it uncomfortable under my arm there. I'd also do an actual concealed zip, which I didn't know how to do at the time.
I'd love to try this in a knit fabric, I think it could be lovely. Then I would omit the zip entirely.
Also, I've lost weight since I wore this first time around, so I might have to take it in a little around the bust. I think it still looks pretty nice though.

Now I've got it out and tried it on again, I plan to both wear this one again, and hopefully make another, maybe even in a smaller size! 

Dresses

Knitting - Yoga Socks

Pattern: Made up as I went
Yarn: Noro Kureyon Sock; S184
Needle: 2.5mm

What I did:
Instead of knitting a heel, I put some stitches onto waste yarn and then continued in pattern down the foot.
I picked up around the heel and worked eight rounds of ribbing.

I measured my foot, the length of the cuff and leg should be the same as the length of the foot and toe cuff, for these socks. I wound the Noro into four small balls. I cast on my usual amount of stitches (64) and worked a ribbed cuff, two at a time from two of the balls, changing colour every four rows, for twelve rows.

Once the foot was long enough, I went back to just one ball of yarn and worked twelve rounds of ribbing, then cast-off loosely.

Verdict: I'm pretty pleased with them. I'll be wearing them to my yoga retreat, so I may update with how they fared in the wild.

Yoga socks


Update: 
If I were to make these again, I'd add a toe-tab to keep them in the right place, I also think I could have made the foot/cuff a little longer.

Tuesday, 16 August 2016

Sewing - Overnight Duffel

I little while ago I signed up to go on a yoga retreat, and I've been looking forward to it. But, looking at my various luggage options there wasn't anything which made me think "yoga retreat" or that would be the sort of size/style I wanted.
I browsed Pinterest (here's my yoga retreat pinterest board) for some ideas, and I thought that the Overnight Duffel from The Stitching Scientist was a good fit.

Once I had decided that this was the bag for me, I had to find some appropriate fabric. I wanted something hardwearing, but also attractive. After a brief search I found this lovely Rose and Hubble Paris inspired fabric at my favourite online fabric store, Remnant House. I also picked up a nice cotton for the contrast and lining.

Supplies

I then began my search for all the other bits I needed. I knew I wanted a zip which would open in the middle, a must for a bag like this if you ask me. I also wanted to add a shoulder strap to the bag as I'm often carrying or holding hands with a toddler and cross-body bags rock for that. This meant that I needed some extra hardwear, specifically a strap adjuster, D-rings, and clip ends for the strap. On the advice of my knitting/sewing online friends on Ravelry, I also got some fuseable fleece for the main bag, and some medium-weight fuseable interfacing.

I printed out the pattern, but I ended up with pieces which just didn't look big enough. So, instead of trying to re-print them (given the difference could be US Letter paper vs A4, or my printer, or the PDF scaling, or a number of other issues) I decided I would simply create my own pieces, but then follow the instructions. The main difference in doing this is that I have redrawn the ends as rectangles with semi-circles on top (for ease of maths) rather than ovals. This also means that the pockets are square. I did a bit of maths to ensure that all my pieces would fit on the fabric, and worked out a layout to cut the pieces.

The two-ended zip that I bought was an X zip - so when you open it the sliders come from either end.

Zip conversion from X to O

However, I wanted them to come from the middle, so I followed Thread Riding Hood's tutorial to do just that.

Zip conversion from X to O

The other main thing I did differently was when inserting the zip. As written, the pattern suggests sewing the main body inside and outside pieces together, then turning them, then inserting the zip between them. However, this would still leave the bare edge of the zip visible inside the bag.
I simply sewed the zip in at the same time as making the top seam of the pieces. This was a little tricky because it meant that when sewing the other side seams of these pieces, I had to fold and pin the other half of the bag sides out of the way. I think it was worth it though.

Bag

Making the shoulder strap has been quite a learning experience. It's important to attach the hardware in the right order. As the swivel-clips don't have a gap to thread the strap through, these have to be inserted and sewn on. The strap adjuster also needs to be sewn on, with the end of the strap looping around the middle bar of the adjuster. I think it works well, but in future I will consider webbing for the straps.

Bag

Verdict

The pattern is nicely written, and if I'd followed it exactly I would still have got a great bag. My modifications just personalise it a little bit.

Adding fuseable fleece was a great idea, it makes the bag seem quite luxurious! I did fleece and medium interfacing on the bottom piece for extra strength, and I'm pleased I did that too.

I might make another of these bags, though if I do I'd consider making it a bit bigger to hold a weekend worth of clothes for everyone. It's been a nice introduction to making bags though, with no interior zips to worry about or strange fastenings.

I especially like the interior finishing, achieved effectively by sewing all the lining pieces to their outers before construction of the bag. I think if one wanted to add more pockets this method of construction would lend itself to doing so quite efficiently. I liked the canvas, but I found it quite hard to sew. Even with my walking foot it wasn't always feeding through evenly with the cotton. This would probably be less of a problem if both fabrics had been craft cotton.

Bag
Fitting the ends into the tube made by the bottom and sides wasn't easy either, partly due to some fit issues I had (the base wasn't quite wide enough, I think because of the conversion from oval to D shaped end.

I also had to think about placement of the tabs for the D-rings, Attaching these had to be done after the end pieces had been assembled, which was made harder by the fact that I wanted to sew them below the top of the pockets.

I'm looking forward to giving this bag its first outing at the Yoga retreat. I just wish I'd made it big enough to hold my Yoga mat too! Oh well. Maybe next time...


Friday, 12 August 2016

Spinning - Willo Fibers kid mohair

So, I spun this a while ago during the TdF, but I've only just got round to uploading the photos for it. I bought the fibre from a festival because I liked the colours.
Mohair

When it came to spinning it, I thought it might be nice if I split it up and spun it as a gradient, from yellow through pink/orange to black (well, deep purple)

Mohair

Details:
Length: approx 125 yards
Type/weight: 3ply DK (ish) yarn
Spin/ply direction: Z spun and S plied on an Ashford Traveller, standard maiden, middle whorl.
Verdict: I like how the colours have come out. The darker colours are much more purple than they seemed in the fibre, but it still works. I think this may be destined to be a hat.

Mohair

Friday, 5 August 2016

Knitting - Bosc Pear

Pattern:  Bosc Pear (Ravelry Link)
Yarn: My hand-dyed gradient 4ply
Needle: 5mm
Mods: I knitted 6 repeats of the pattern - not enough yarn for the 7 as written. I stopped at the end of the stst section and did a row of 2yo, s2kpsso before picot bindoff, to make the bindoff edge look a bit more like the side picots.

Untitled

Verdict: I like it. I'm pleased I used quite a big needle, and the colours work better than I expected.
I had hoped that the colours would fade into one another more than they do, but the striped effect is pretty too, and it looks nice when worn with the two different coloured ends.

Untitled

Wednesday, 3 August 2016

Spinning - Threshing Barn merino/silk

Threshing Barn are often present at the various wool shows I like to go to. The colours of this roving called to me when I saw them, and I had to have it.

British Wool Weekend New Stuff!

Details:
Length: approx 260 yards
Type/weight: 2ply sport weight (ish) yarn
Spin/ply direction: Z spun and S plied on an Ashford Traveller, standard maiden, middle whorl.

Untitled

Verdict

I like it, it's nice and springy. I have no idea what I'm going to make it into, there's probably enough for a scarf or something like that. I might spin something else to go with it, then I could make it into a garment of some sort.

Tuesday, 2 August 2016

Sewing - Simplicity 1716 knit mini-dress, tunic and top

Simplicity 1716 is described as:
Knit mini-dress, tunic and top can be made with a front twist or draped neckline with five different sleeve variations to choose from.

I thought it looked really wearable, so I went out and picked up two fabrics, with a view to making at least two of them! I got the bolt-end of some brown patterned knit fabric, and on measuring in the shop we thought I'd have enough for the tunic version, but probably nothing more.

I washed and dried the fabric, and then laid it out on my dining table. I was surprised and pleased to see that once I laid out the pieces for dress view A with sleeves E, I actually had enough in the knit for the full dress!

It was pretty quick to make, I spent a while cutting out and pinning because of the nature of knit fabric. It actually wasn't as scary to work with knit fabric as I'd expected, but I wish I'd had a walking foot (I have ordered one for next time!)

Untitled

Modifications and Adjustments

I graded out the hips to a size larger than the rest of the dress. I made the 14, grading to a 16 at the hip. With hindsight this wasn't really necessary given the stretch of the dress fabric and the design ease it's written with. I tacked the inside of the front collar down in two places to ensure that it didn't flip over.

Verdict

I love it. I'm wearing it as I write this and it's comfy to wear. I feel pretty stylish in it too, which is great. If I were being very critical, I'd say that the dress feels like it rides up a bit at the back, but whether that's because of the size of my bottom or the fabric I am not sure.
I am going to make another one, I have the fabric already laundered! But I'll probably make the bag(s) and the simplicity sewing challenge dress and skirt first.

Untitled

Tuesday, 12 July 2016

Spinning - Spin City Funky Roving

Spin City has some of the most amazing colours! I got these two braids of roving at a fibre festival, I can't even remember which one. Probably Fibre East.

Tour de Fleece 2016

The Tour De Fleece (which runs alongside the Tour de France cycling event) prompted me to start spinning this lovely fibre, and it's been a lot of fun to spin. The colours play with one another well, and the resulting singles are pretty and vibrant. (some of these are progress shots!)

Tour de fleece 2016 day 3

I used my Ashford Traveller, and the only problem I have with it is that you can't see how the singles are winding onto the bobbin because of the setup of the wheel. If I ever get a different wheel (unlikely!) I'd consider getting one where the wheel and bobbin are set out differently.

It took me just over a week to spin both singles, which I then plied together into a lovely barber-poled yarn. I Andean plied the last few yards and joined them all together to make one monster skein.

Spin city merino 550yd sport-ish

Details:
Length: approx 550 yards 
Type/weight: 2ply sport weight (ish) yarn
Spin/ply direction: Z spun and S plied on an Ashford Traveller, standard maiden, middle whorl.


Verdict

I'm very pleased with it! Now I just need to figure out what to knit with it!
It does still need a bath and finishing, but I'm going to do that en-masse when the tour is finished.

Friday, 3 June 2016

Sewing - Draped Top from Sew Magazine

Draped top
I bought the Sew Magazine Vintage special recently. It has such a variety of patterns in it. I was really excited about the Vogue pattern that came with the magazine, but inside I found a lovely 1920's-inspired draped top.

Pattern: Not really a pattern, just a guide in the magazine.

This fabric was leftover from the Simplicity 2369 dress that I made for my wedding anniversary. It's a knit of unknown composition, but I suspect it's probably polyester.

Modifications and adjustments
Since this is a draft-it-yourself pattern, I didn't make any modifications. When I make it again, I'm going to learn how to use the invisible hem foot on my sewing machine rather than wonderweb (hemming web) because I think it will make the sleeves drape nicely.

I also think it would work well with more fabric on the front neck for a really drapey look, and it might also be nice in a woven fabric, though I'd want a bit more ease around the hips in that case.

Tuesday, 31 May 2016

Sewing - Simplicity 6483 - 1 hour top

When my copy of Sew Magazine arrived earlier in the month, it had a one-hour top pattern with it. I couldn't resist, and though it took me more like 4 hours all together, I'm pretty pleased with the result.

Pattern: Simplicity 6483, view D
I had just enough of this lovely blue fabric to cut out all of the pieces, though the neck facings weren't cut on the grain as they were meant to be.

Modifications and adjustments
I didn't make any. I made the size 16 as written. With hindsight, I think that was the wrong choice, as I have some gaping issues around the arms,  and there feels like there is a lot of fabric in the back.

 
When I make this again (and I do intend to make another) I might make a smaller size and adjust for the bust. We will see. I think taking more measurements of myself, and of the garment I have finished, might help me to make that decision.

Tuesday, 17 May 2016

Knitting - Basket Weave Socks

Pattern: Basket Weave Socks (Ravelry Link)
Yarn: Pagewood Farm Yukon, Vineyard Blues
Needle: 2.5mm

I measured a pair of my husband's hand-knit socks to get the right size. Originally these were going to be a birthday gift for him, but they're more than 2 months late! Fortunately he's very forgiving about hand-knit socks! Instead of writing down a bunch of measurements, knowing how tape-measures like to go walkabout, I simply drew marks on my piece of paper for the length of the cuff, leg, and foot. I also made a note of the pattern so that I wouldn't have to refer to the electronic version. (my laptop and my printer don't talk to one another).

Modifications and Adjustments: I did a twisted rib cuff. I didn't do the heel as written, I did a sort-of-afterthought heel. My husband tells me that the afterthought heel fits him nicely, so once I had knitted to where the heel should be I left a row of contrasting yarn. When I had finished the toes I went back and picked up the stitches around the contrasting yarn and then knitted a toe/heel. After trying on, he'd have preferred a longer cuff. I don't know what's gone wrong there, but I might have included the cuff in the leg length when measuring during knitting, but not when I made the marks. 

Verdict: The pattern is pretty easy to work, once I'd got going. The yarn is lovely. If it were any other colour I'd probably be making something for myself from it! 


Thursday, 21 April 2016

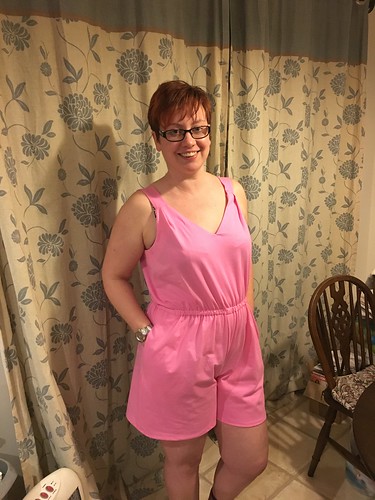
Sewing - Simplicity 1142 - Jumpsuit (short version)

PatternSimplicity 1142
I made bodice A with shorts B. The pattern says it's suitable for use with knits, so as an experiment (before I use the nice non-stretchy fabric I wanted to make this from) I decided to have a go with some bright pink knit fabric I've had in the stash for a while.

Modifications and Adjustments:
I took my measurements and looked at the pattern. I was measuring a little bit bigger than the M on top (less than ½") but I needed an L for my hips. So, given that this was using a stretch fabric, I decided to make the M bodice and the L shorts, and ease them to the same size at the waist. (This is one of the reasons I love making my own clothes!)

It's about 2" difference between sizes at the waist, which is probably more than I'd want to try to ease on a non-stretch fabric, even with an elasticated waist. If I do make it again in then I will grade the shorts to the smaller size.

Jumpsuit

Verdict: 
I'm pretty happy with this playsuit! I think I'd like the waist to be a little lower, so I'd lengthen the bodice slightly. I like the pockets; this is the first time I've put pockets into a garment and I'm really pleased with them. It makes me want to put pockets into everything! I'm not sure about the back, It's a very fashionable style at the moment, but there's the visible bra-strap issue; if I wore a smaller cup than an F I might just go bra-less. If I make another one (I'm still undecided) then I'll probably either adjust the back somehow (lace panel, cut less steeply, same as the front, or something else)

Jumpsuit

Tuesday, 19 April 2016

Sewing - Reversible Bucket Hats!

Toddler Pattern: Free Download from the Oliver & S site
Adult Pattern: Kitsch Bitsch

Adjustments and alterations: Both patterns use basically the same method to put the hats together, with a couple of small exceptions. The toddler hat has two pieces each for the side and brim, which you are to cut out and then tape together. The Kitsch hat simply has you cut that piece on the fold, so you only need one half. If (like me) you're always looking to save paper and ink, then only print the crown and one each of the side and brim pieces, and then cut them on the fold.

Toddler Hat
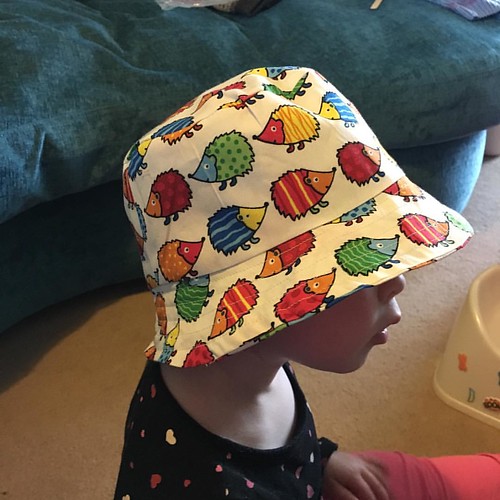
I've made this hat for my little girl before. Last summer I found some cute dinosaur fabric, and I couldn't resist making her some hats from it. This summer I bought some hedgehog fabric (which is meant to be a bean-bag!) and when I decided that she needed a hat, I knew I wanted to use this fabric. It's pretty firm, so I didn't interface any of it. I basically followed the directions from the Kitsch hat to put the pieces together, still trimming the seam allowances to ¼" after sewing. I still top-stitched around the crown, and I did some top-stitching on the brim too.

Viola! A cute hedgehog bucket hat!

#naptime #sewing #hat @oliverands #buckethat I think she likes it!

Verdict (Toddler hat):
It's really cute! Because I'd accidentally printed at 106% I've made the smallest size. It worked well for my 22 month old. It's probably not really reversible though, because I cut out the inside pieces upside-down!

Adult Hat
I had some denim left over from the jacket I've been making, and I need a hat for my holiday, so I thought I'd have a go at making myself a bucket hat. I love the way they look, but they never fit me especially well. To get a good fit, I made the "inside" hat first. That way I could make adjustments to the size of everything one the easier-to-sew cotton. Because the denim is pretty firm, I decided not to interface the brim.

Once I'd stitched the hats together, and turned them the right way in, I did a little more stitching on the adult hat than called for. I did one line of top-stitching around the crown, to help keep the two parts together, and one round of top stitching on the brim.

Despite trying on the lining, and even at the time thinking "hm, this seems a little roomy", when I tried the hat on it was too big.

Bit big? #kitschbitsch #buckethat #sewing

So, I took it apart and re-made it. If I'd had more of the denim, I'd have considered just starting fresh. The main thing I did was switch to the smaller pattern size. I also reduced the height of the sides by about ½". I didn't top-stitch around the crown this time, but I did several concentric rows of stitching on the brim which gives it a bit more firmness.

Much better! #sewing #buckethat #kitschbitsch #reconstructed - now I just need to top stitch the brim and it's done!

Viola! a reversible bucket hat for my holiday!

Verdict (Adult hat):
I like it. I think the pattern as written might be a little tall for my liking, but because there isn't a square to confirm my sizing, it is possible that I simply printed it too big. That would explain why the small has been the right size when I thought it would be too small.

Untitled

Saturday, 2 April 2016

Crochet - Piquant

Yarn: Schoppel-Wolle Lace Ball (90% of a ball)
Hook: 4.5mm
Mods: I used laceweight where the pattern called for 4ply/sock. I made more repeats than the smaller size, but fewer than the larger size.
Verdict: I love it!

Zauberball lace

I love the Zauberball yarn by Schoppel-Wolle, so how could I resist the lace weight of the same type. It has amazing long repeats of colour which provide the opportunity for some creative projects.

The pattern is worked in 3 parts, the band, the edges, and then the center is "filled in".
The edging was difficult, but well worth it. The rest of the pattern was pretty easy, and a great TV or travelling project. 

Piquant

I'm really pleased with it. It's lovely to wear, and looks really intricate. I've already had comments on how fab it looks.

Piquant

Friday, 1 April 2016

Spinning - BFL/Jacob

On May 1st-3rd 2015 there was a cycling event near me, the inaugural "Tour de Yorkshire". We went out to see the riders pass through Wetwang, and then caught them again just before Stamford Bridge. It was great fun, and I hope it keeps going!

Anyway, in honour of this I started some spinning. Like with the Tour de Fleece (more on that later) I aimed to spin on every day they cycled. I got something like 75% through the Jacob part of the fibre I have.

So, let me tell you about the fibre. I bought it from Fibre East last year, from the Sara's Texture Crafts stand. (She has an Etsy store, but be warned the stuff she sells is glorious!)


I decided that I was going to spin each fibre separately, and then ply them together. While this meant that I ended up with a bit leftover of the BFL, I tried it because I hoped that the yarn would be pretty.

The Jacob has a shorter staple than I'm used to, but once I got going it was pretty fun to spin. It's come out a kind of tweedy grey on the bobbin. (shown below on the right)

Ready to #ply

The BFL was, of course, a joy to spin. It's one of my favourite fibres, being a longish staple and lustrous too, it's easy to feel like a spinning champion when I'm spinning BFL. I tried to spin the same sort of grist as for the Jacob; I think I managed it most of the time.

Done! #spinning #yarn


Having let the Jacob sit for almost a year (crikey!) plying was difficult because it was almost impossible to know if the yarn was balanced. In the end I opted for a generic amount of twist with the hope that it would even out.

It's not really this green, and needs a wash and whack. #spinning


So, it's not quite so green as in that picture, early morning light in the winter made it look a bit funny. You can see, though, that some areas are a bit under-spun and under-plied. It's not too bad, but I think I should have spun it with a bit more twist, and then plied with a bit more twist too. I'm also not as keen on spinning 2-ply yarns, I like the shape and texture of the N-ply best. But, this 2ply will be much nicer for knitting something a bit soft. It wouldn't be ideal for a scarf because the Jacob is a bit scratchy. I'll have to think about what it might be good for.

Overall the yarn isn't as pretty as I'd hoped, but it's nice enough.

Details:
approx 309 yards of 2ply fingering weight (ish) yarn, Z spun and S plied on an Ashford Traveller, standard maiden, middle whorl.

Just a final note about the Tour de Fleece. It runs (on Ravelry) at the same time as the Tour de France, which this year is the 4th July to the 26th July. It also happens off Ravelry on various crafty blogs, so watch out for that! I'll be taking part, hopefully I'll be in the peloton! I aim to spin on every day the riders ride. I'm not trying to sprint (spinning a lot of yarn) or win the King of the Mountains (spinning something hard, a personal challenge).