I bought the Sew Magazine Vintage special recently. It has such a variety of patterns in it. I was really excited about the Vogue pattern that came with the magazine, but inside I found a lovely 1920's-inspired draped top.
Pattern: Not really a pattern, just a guide in the magazine.
This fabric was leftover from the Simplicity 2369 dress that I made for my wedding anniversary. It's a knit of unknown composition, but I suspect it's probably polyester.
Modifications and adjustments
Since this is a draft-it-yourself pattern, I didn't make any modifications. When I make it again, I'm going to learn how to use the invisible hem foot on my sewing machine rather than wonderweb (hemming web) because I think it will make the sleeves drape nicely.
I also think it would work well with more fabric on the front neck for a really drapey look, and it might also be nice in a woven fabric, though I'd want a bit more ease around the hips in that case.
Friday, 3 June 2016
Tuesday, 31 May 2016
Sewing - Simplicity 6483 - 1 hour top
When my copy of Sew Magazine arrived earlier in the month, it had a one-hour top pattern with it. I couldn't resist, and though it took me more like 4 hours all together, I'm pretty pleased with the result.
Pattern: Simplicity 6483, view D
I had just enough of this lovely blue fabric to cut out all of the pieces, though the neck facings weren't cut on the grain as they were meant to be.
Modifications and adjustments
I didn't make any. I made the size 16 as written. With hindsight, I think that was the wrong choice, as I have some gaping issues around the arms, and there feels like there is a lot of fabric in the back.
When I make this again (and I do intend to make another) I might make a smaller size and adjust for the bust. We will see. I think taking more measurements of myself, and of the garment I have finished, might help me to make that decision.
Pattern: Simplicity 6483, view D
I had just enough of this lovely blue fabric to cut out all of the pieces, though the neck facings weren't cut on the grain as they were meant to be.
Modifications and adjustments
I didn't make any. I made the size 16 as written. With hindsight, I think that was the wrong choice, as I have some gaping issues around the arms, and there feels like there is a lot of fabric in the back.
When I make this again (and I do intend to make another) I might make a smaller size and adjust for the bust. We will see. I think taking more measurements of myself, and of the garment I have finished, might help me to make that decision.
Tuesday, 17 May 2016
Knitting - Basket Weave Socks
Pattern: Basket Weave Socks (Ravelry Link)
Yarn: Pagewood Farm Yukon, Vineyard Blues
Needle: 2.5mm
I measured a pair of my husband's hand-knit socks to get the right size. Originally these were going to be a birthday gift for him, but they're more than 2 months late! Fortunately he's very forgiving about hand-knit socks! Instead of writing down a bunch of measurements, knowing how tape-measures like to go walkabout, I simply drew marks on my piece of paper for the length of the cuff, leg, and foot. I also made a note of the pattern so that I wouldn't have to refer to the electronic version. (my laptop and my printer don't talk to one another).
Modifications and Adjustments: I did a twisted rib cuff. I didn't do the heel as written, I did a sort-of-afterthought heel. My husband tells me that the afterthought heel fits him nicely, so once I had knitted to where the heel should be I left a row of contrasting yarn. When I had finished the toes I went back and picked up the stitches around the contrasting yarn and then knitted a toe/heel. After trying on, he'd have preferred a longer cuff. I don't know what's gone wrong there, but I might have included the cuff in the leg length when measuring during knitting, but not when I made the marks.
Verdict: The pattern is pretty easy to work, once I'd got going. The yarn is lovely. If it were any other colour I'd probably be making something for myself from it!
Yarn: Pagewood Farm Yukon, Vineyard Blues
Needle: 2.5mm
Modifications and Adjustments: I did a twisted rib cuff. I didn't do the heel as written, I did a sort-of-afterthought heel. My husband tells me that the afterthought heel fits him nicely, so once I had knitted to where the heel should be I left a row of contrasting yarn. When I had finished the toes I went back and picked up the stitches around the contrasting yarn and then knitted a toe/heel. After trying on, he'd have preferred a longer cuff. I don't know what's gone wrong there, but I might have included the cuff in the leg length when measuring during knitting, but not when I made the marks.
Verdict: The pattern is pretty easy to work, once I'd got going. The yarn is lovely. If it were any other colour I'd probably be making something for myself from it!
Thursday, 21 April 2016
Sewing - Simplicity 1142 - Jumpsuit (short version)
Pattern: Simplicity 1142
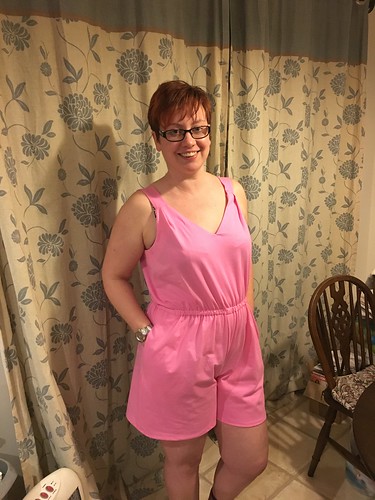
I made bodice A with shorts B. The pattern says it's suitable for use with knits, so as an experiment (before I use the nice non-stretchy fabric I wanted to make this from) I decided to have a go with some bright pink knit fabric I've had in the stash for a while.
Modifications and Adjustments:
I took my measurements and looked at the pattern. I was measuring a little bit bigger than the M on top (less than ½") but I needed an L for my hips. So, given that this was using a stretch fabric, I decided to make the M bodice and the L shorts, and ease them to the same size at the waist. (This is one of the reasons I love making my own clothes!)
It's about 2" difference between sizes at the waist, which is probably more than I'd want to try to ease on a non-stretch fabric, even with an elasticated waist. If I do make it again in then I will grade the shorts to the smaller size.
Verdict:
I'm pretty happy with this playsuit! I think I'd like the waist to be a little lower, so I'd lengthen the bodice slightly. I like the pockets; this is the first time I've put pockets into a garment and I'm really pleased with them. It makes me want to put pockets into everything! I'm not sure about the back, It's a very fashionable style at the moment, but there's the visible bra-strap issue; if I wore a smaller cup than an F I might just go bra-less. If I make another one (I'm still undecided) then I'll probably either adjust the back somehow (lace panel, cut less steeply, same as the front, or something else)
I made bodice A with shorts B. The pattern says it's suitable for use with knits, so as an experiment (before I use the nice non-stretchy fabric I wanted to make this from) I decided to have a go with some bright pink knit fabric I've had in the stash for a while.
Modifications and Adjustments:
I took my measurements and looked at the pattern. I was measuring a little bit bigger than the M on top (less than ½") but I needed an L for my hips. So, given that this was using a stretch fabric, I decided to make the M bodice and the L shorts, and ease them to the same size at the waist. (This is one of the reasons I love making my own clothes!)
It's about 2" difference between sizes at the waist, which is probably more than I'd want to try to ease on a non-stretch fabric, even with an elasticated waist. If I do make it again in then I will grade the shorts to the smaller size.
Verdict:
I'm pretty happy with this playsuit! I think I'd like the waist to be a little lower, so I'd lengthen the bodice slightly. I like the pockets; this is the first time I've put pockets into a garment and I'm really pleased with them. It makes me want to put pockets into everything! I'm not sure about the back, It's a very fashionable style at the moment, but there's the visible bra-strap issue; if I wore a smaller cup than an F I might just go bra-less. If I make another one (I'm still undecided) then I'll probably either adjust the back somehow (lace panel, cut less steeply, same as the front, or something else)
Tuesday, 19 April 2016
Sewing - Reversible Bucket Hats!
Toddler Pattern: Free Download from the Oliver & S site
Adult Pattern: Kitsch Bitsch
Adjustments and alterations: Both patterns use basically the same method to put the hats together, with a couple of small exceptions. The toddler hat has two pieces each for the side and brim, which you are to cut out and then tape together. The Kitsch hat simply has you cut that piece on the fold, so you only need one half. If (like me) you're always looking to save paper and ink, then only print the crown and one each of the side and brim pieces, and then cut them on the fold.
Toddler Hat
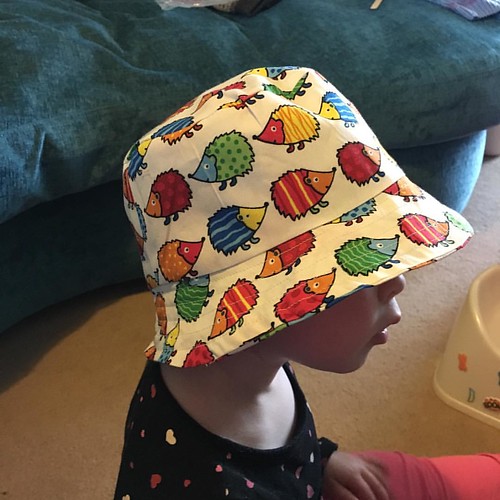
I've made this hat for my little girl before. Last summer I found some cute dinosaur fabric, and I couldn't resist making her some hats from it. This summer I bought some hedgehog fabric (which is meant to be a bean-bag!) and when I decided that she needed a hat, I knew I wanted to use this fabric. It's pretty firm, so I didn't interface any of it. I basically followed the directions from the Kitsch hat to put the pieces together, still trimming the seam allowances to ¼" after sewing. I still top-stitched around the crown, and I did some top-stitching on the brim too.
Viola! A cute hedgehog bucket hat!
Verdict (Toddler hat):
It's really cute! Because I'd accidentally printed at 106% I've made the smallest size. It worked well for my 22 month old. It's probably not really reversible though, because I cut out the inside pieces upside-down!
Adult Hat
I had some denim left over from the jacket I've been making, and I need a hat for my holiday, so I thought I'd have a go at making myself a bucket hat. I love the way they look, but they never fit me especially well. To get a good fit, I made the "inside" hat first. That way I could make adjustments to the size of everything one the easier-to-sew cotton. Because the denim is pretty firm, I decided not to interface the brim.
Once I'd stitched the hats together, and turned them the right way in, I did a little more stitching on the adult hat than called for. I did one line of top-stitching around the crown, to help keep the two parts together, and one round of top stitching on the brim.
Despite trying on the lining, and even at the time thinking "hm, this seems a little roomy", when I tried the hat on it was too big.
So, I took it apart and re-made it. If I'd had more of the denim, I'd have considered just starting fresh. The main thing I did was switch to the smaller pattern size. I also reduced the height of the sides by about ½". I didn't top-stitch around the crown this time, but I did several concentric rows of stitching on the brim which gives it a bit more firmness.
Viola! a reversible bucket hat for my holiday!
Verdict (Adult hat):
I like it. I think the pattern as written might be a little tall for my liking, but because there isn't a square to confirm my sizing, it is possible that I simply printed it too big. That would explain why the small has been the right size when I thought it would be too small.
Adult Pattern: Kitsch Bitsch
Adjustments and alterations: Both patterns use basically the same method to put the hats together, with a couple of small exceptions. The toddler hat has two pieces each for the side and brim, which you are to cut out and then tape together. The Kitsch hat simply has you cut that piece on the fold, so you only need one half. If (like me) you're always looking to save paper and ink, then only print the crown and one each of the side and brim pieces, and then cut them on the fold.
Toddler Hat
I've made this hat for my little girl before. Last summer I found some cute dinosaur fabric, and I couldn't resist making her some hats from it. This summer I bought some hedgehog fabric (which is meant to be a bean-bag!) and when I decided that she needed a hat, I knew I wanted to use this fabric. It's pretty firm, so I didn't interface any of it. I basically followed the directions from the Kitsch hat to put the pieces together, still trimming the seam allowances to ¼" after sewing. I still top-stitched around the crown, and I did some top-stitching on the brim too.
Viola! A cute hedgehog bucket hat!
Verdict (Toddler hat):
It's really cute! Because I'd accidentally printed at 106% I've made the smallest size. It worked well for my 22 month old. It's probably not really reversible though, because I cut out the inside pieces upside-down!
Adult Hat
I had some denim left over from the jacket I've been making, and I need a hat for my holiday, so I thought I'd have a go at making myself a bucket hat. I love the way they look, but they never fit me especially well. To get a good fit, I made the "inside" hat first. That way I could make adjustments to the size of everything one the easier-to-sew cotton. Because the denim is pretty firm, I decided not to interface the brim.
Once I'd stitched the hats together, and turned them the right way in, I did a little more stitching on the adult hat than called for. I did one line of top-stitching around the crown, to help keep the two parts together, and one round of top stitching on the brim.
Despite trying on the lining, and even at the time thinking "hm, this seems a little roomy", when I tried the hat on it was too big.
So, I took it apart and re-made it. If I'd had more of the denim, I'd have considered just starting fresh. The main thing I did was switch to the smaller pattern size. I also reduced the height of the sides by about ½". I didn't top-stitch around the crown this time, but I did several concentric rows of stitching on the brim which gives it a bit more firmness.
Viola! a reversible bucket hat for my holiday!
Verdict (Adult hat):
I like it. I think the pattern as written might be a little tall for my liking, but because there isn't a square to confirm my sizing, it is possible that I simply printed it too big. That would explain why the small has been the right size when I thought it would be too small.
Saturday, 2 April 2016
Crochet - Piquant
Yarn: Schoppel-Wolle Lace Ball (90% of a ball)
Hook: 4.5mm
Mods: I used laceweight where the pattern called for 4ply/sock. I made more repeats than the smaller size, but fewer than the larger size.
Verdict: I love it!

I'm really pleased with it. It's lovely to wear, and looks really intricate. I've already had comments on how fab it looks.
Hook: 4.5mm
Mods: I used laceweight where the pattern called for 4ply/sock. I made more repeats than the smaller size, but fewer than the larger size.
Verdict: I love it!
I love the Zauberball yarn by Schoppel-Wolle, so how could I resist the lace weight of the same type. It has amazing long repeats of colour which provide the opportunity for some creative projects.
The pattern is worked in 3 parts, the band, the edges, and then the center is "filled in".
The edging was difficult, but well worth it. The rest of the pattern was pretty easy, and a great TV or travelling project.

I'm really pleased with it. It's lovely to wear, and looks really intricate. I've already had comments on how fab it looks.
Friday, 1 April 2016
Spinning - BFL/Jacob
On May 1st-3rd 2015 there was a cycling event near me, the inaugural "Tour de Yorkshire". We went out to see the riders pass through Wetwang, and then caught them again just before Stamford Bridge. It was great fun, and I hope it keeps going!
Anyway, in honour of this I started some spinning. Like with the Tour de Fleece (more on that later) I aimed to spin on every day they cycled. I got something like 75% through the Jacob part of the fibre I have.
So, let me tell you about the fibre. I bought it from Fibre East last year, from the Sara's Texture Crafts stand. (She has an Etsy store, but be warned the stuff she sells is glorious!)
I decided that I was going to spin each fibre separately, and then ply them together. While this meant that I ended up with a bit leftover of the BFL, I tried it because I hoped that the yarn would be pretty.
The Jacob has a shorter staple than I'm used to, but once I got going it was pretty fun to spin. It's come out a kind of tweedy grey on the bobbin. (shown below on the right)
The BFL was, of course, a joy to spin. It's one of my favourite fibres, being a longish staple and lustrous too, it's easy to feel like a spinning champion when I'm spinning BFL. I tried to spin the same sort of grist as for the Jacob; I think I managed it most of the time.
Having let the Jacob sit for almost a year (crikey!) plying was difficult because it was almost impossible to know if the yarn was balanced. In the end I opted for a generic amount of twist with the hope that it would even out.
So, it's not quite so green as in that picture, early morning light in the winter made it look a bit funny. You can see, though, that some areas are a bit under-spun and under-plied. It's not too bad, but I think I should have spun it with a bit more twist, and then plied with a bit more twist too. I'm also not as keen on spinning 2-ply yarns, I like the shape and texture of the N-ply best. But, this 2ply will be much nicer for knitting something a bit soft. It wouldn't be ideal for a scarf because the Jacob is a bit scratchy. I'll have to think about what it might be good for.
Overall the yarn isn't as pretty as I'd hoped, but it's nice enough.
Details:
approx 309 yards of 2ply fingering weight (ish) yarn, Z spun and S plied on an Ashford Traveller, standard maiden, middle whorl.
Just a final note about the Tour de Fleece. It runs (on Ravelry) at the same time as the Tour de France, which this year is the 4th July to the 26th July. It also happens off Ravelry on various crafty blogs, so watch out for that! I'll be taking part, hopefully I'll be in the peloton! I aim to spin on every day the riders ride. I'm not trying to sprint (spinning a lot of yarn) or win the King of the Mountains (spinning something hard, a personal challenge).
Anyway, in honour of this I started some spinning. Like with the Tour de Fleece (more on that later) I aimed to spin on every day they cycled. I got something like 75% through the Jacob part of the fibre I have.
So, let me tell you about the fibre. I bought it from Fibre East last year, from the Sara's Texture Crafts stand. (She has an Etsy store, but be warned the stuff she sells is glorious!)
I decided that I was going to spin each fibre separately, and then ply them together. While this meant that I ended up with a bit leftover of the BFL, I tried it because I hoped that the yarn would be pretty.
The Jacob has a shorter staple than I'm used to, but once I got going it was pretty fun to spin. It's come out a kind of tweedy grey on the bobbin. (shown below on the right)
The BFL was, of course, a joy to spin. It's one of my favourite fibres, being a longish staple and lustrous too, it's easy to feel like a spinning champion when I'm spinning BFL. I tried to spin the same sort of grist as for the Jacob; I think I managed it most of the time.
Having let the Jacob sit for almost a year (crikey!) plying was difficult because it was almost impossible to know if the yarn was balanced. In the end I opted for a generic amount of twist with the hope that it would even out.
So, it's not quite so green as in that picture, early morning light in the winter made it look a bit funny. You can see, though, that some areas are a bit under-spun and under-plied. It's not too bad, but I think I should have spun it with a bit more twist, and then plied with a bit more twist too. I'm also not as keen on spinning 2-ply yarns, I like the shape and texture of the N-ply best. But, this 2ply will be much nicer for knitting something a bit soft. It wouldn't be ideal for a scarf because the Jacob is a bit scratchy. I'll have to think about what it might be good for.
Overall the yarn isn't as pretty as I'd hoped, but it's nice enough.
Details:
approx 309 yards of 2ply fingering weight (ish) yarn, Z spun and S plied on an Ashford Traveller, standard maiden, middle whorl.
Just a final note about the Tour de Fleece. It runs (on Ravelry) at the same time as the Tour de France, which this year is the 4th July to the 26th July. It also happens off Ravelry on various crafty blogs, so watch out for that! I'll be taking part, hopefully I'll be in the peloton! I aim to spin on every day the riders ride. I'm not trying to sprint (spinning a lot of yarn) or win the King of the Mountains (spinning something hard, a personal challenge).
Subscribe to:
Posts (Atom)