Pattern: Hemlock Ring as re-imagined by Brooklyn Tweed
Yarn: Greengate Lincoln Longwool - 10 balls
Needle: 6mm
Modifications: I found my stitch counts to be out on occasion, so I fudged it a few times. I also lost at yarn chicken with about 50 stitches left to bind off, so I borrowed some sock yarn which was the same yellowish shade, held double.
before blocking:
Verdict: I love it!
The yarn is not a soft one, not the kind of thing you want next to your skin. However, the blanket is warm and cosy, and it's softened up a great deal in the wash.
I had intended to finish this in order to use it as my blanket on the Yoga retreat I went on in early September. However, it was still in progress. I took it with me still, as my evening crafting! I think this was part of the reason for my row mismatches! Not that you can tell.
This is also part of my mission to knit with the rare breeds on the RBST watchlist. Lincoln Longwool Sheep are considered to be "At Risk" with between 900 and 1500 breeding females in the UK. They're a big sheep with long dreadlock-like fleece. They are an excellent meat sheep as well as producing lustrous wool which is excellent for rugs and outerwear. I hope that this means that my blanket will be hardwearing and warm, and will make a nice bed-topper.
I enjoyed knitting the pattern, but I found I kept losing track of where I was in the feather and fan pattern. I think circular blankets are a lovely idea, but I'm not sure how practical they are, only time will tell!
Wednesday, 22 November 2017
Crochet - Figpox Farms Logpile Mittens
Pattern: Woodpile Mittens from Figpox Farms Designs
Yarn: Evoke hand dyed yarn; Treliske Merino (Earth Mother)
Mods: None! Which is a challenge for me, but I was test-crocheting these so I needed to follow the pattern.
Verdict: Fab! They're cute, cosy, and they actually fit quite nicely for such simple mittens. Easily achievable for a beginner and variable to a range of yarn weights and amounts.
Yarn: Evoke hand dyed yarn; Treliske Merino (Earth Mother)
Mods: None! Which is a challenge for me, but I was test-crocheting these so I needed to follow the pattern.
Verdict: Fab! They're cute, cosy, and they actually fit quite nicely for such simple mittens. Easily achievable for a beginner and variable to a range of yarn weights and amounts.
Monday, 30 October 2017
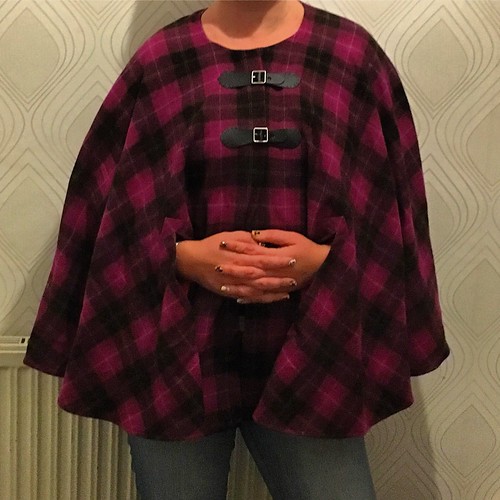
Sewing - Sew Magazine Wool Cape
Pattern: Sew Magazine's January 2016 Wool Cape
Main Fabric: 3 meters of pink tartan from Ebay, wool or wool blend
Lining: 3 meters of pink viscose, also from Ebay.
Sundries: two kilt buckles, I decided on black. Thread to match the wool fabric, and black thread for the buckles.
Modifications: I topstitched around the neck and around the bottom of the cape to prevent the lining from bagging at the bottom. If I were to make it again, I would do a bit of self-facing at the bottom like the inside of the front opening, and probably make the lining shorter still.
The scariest part was cutting the arm-holes out!
Verdict: It's pretty cool! I'm not sure how practical it is, but we'll see. I wonder if I could wear it on the bike...
Main Fabric: 3 meters of pink tartan from Ebay, wool or wool blend
Lining: 3 meters of pink viscose, also from Ebay.
Sundries: two kilt buckles, I decided on black. Thread to match the wool fabric, and black thread for the buckles.
Modifications: I topstitched around the neck and around the bottom of the cape to prevent the lining from bagging at the bottom. If I were to make it again, I would do a bit of self-facing at the bottom like the inside of the front opening, and probably make the lining shorter still.
The scariest part was cutting the arm-holes out!
Verdict: It's pretty cool! I'm not sure how practical it is, but we'll see. I wonder if I could wear it on the bike...
Friday, 6 October 2017
Sarah and Duck hat
Pattern: Sarah and Duck Hat from CBeebies
Yarn: West Yorkshire Spinners Aire Valley Aran
Needle: 4.5mm?
Modifications:
I only cast on 78 (and 36 for the doll's) and adjusted the decreases accordingly.
Verdict:
the toddler loves both, so who can argue with that?
Yarn: West Yorkshire Spinners Aire Valley Aran
Needle: 4.5mm?
Modifications:
I only cast on 78 (and 36 for the doll's) and adjusted the decreases accordingly.
Verdict:
the toddler loves both, so who can argue with that?
Friday, 15 September 2017
Destashing
We're moving house.
As part of moving house we're also de-cluttering.
What does this have to do with a craft blog, you might ask?
Well, as part of the de-cluttering I am de-stashing and reducing my crafty things.
Before I began I had 144 different yarns in my stash (on ravelry), plus lots of un-recorded yarn, totaling enough mileage to travel to the coast and back! I knew I needed to have a method for sorting out my yarn, so initially I turned to Ravelry. (If you're a knitter or crocheter and you've never visited www.raverly.com then I heartily recommend it!)
One of the fun things you can do in Ravelry is to have a page of favourite patterns, things you might make one day, things which are inspiring. I used my favourites to decide what the next year's knitting might look like for me. I used this to generate a "queue" to which I could then allocate yarn.
20 yarns are required for my queue. They're going to be a mixture of sweaters for me, sweaters for the toddler, scarves, hats, and ponchos.
So that's 124 yarns which are not required.
I then looked at the remaining 124 yarns and I asked myself some questions:
This also means that I know what's in my stash now, and there's nothing that I wouldn't be happy to make into a garment, accessory, etc, and wear.
As part of moving house we're also de-cluttering.
What does this have to do with a craft blog, you might ask?
Well, as part of the de-cluttering I am de-stashing and reducing my crafty things.
Before I began I had 144 different yarns in my stash (on ravelry), plus lots of un-recorded yarn, totaling enough mileage to travel to the coast and back! I knew I needed to have a method for sorting out my yarn, so initially I turned to Ravelry. (If you're a knitter or crocheter and you've never visited www.raverly.com then I heartily recommend it!)
One of the fun things you can do in Ravelry is to have a page of favourite patterns, things you might make one day, things which are inspiring. I used my favourites to decide what the next year's knitting might look like for me. I used this to generate a "queue" to which I could then allocate yarn.
20 yarns are required for my queue. They're going to be a mixture of sweaters for me, sweaters for the toddler, scarves, hats, and ponchos.
![]() |
| 20 yarns in my queue, lots of colours! |
So that's 124 yarns which are not required.
I then looked at the remaining 124 yarns and I asked myself some questions:
- Would I buy this now?
- Will I wear something that I make with this yarn (or would I give it to someone)?
- Would it be expensive to replace?
- Do I want the yarn more than the space?
Some yarns went into a bag to let my knitting group look at, and anything they didn't want has now gone off to be donated to charity.
Some yarns went into a "for sale or trade" box - well, two boxes, containing 57 yarns, several with more than one skein. I've sold several of these now.
This left me with 70 yarns which are not queued, but that I want to keep.
28 are handspun, which I'm clearly not going to get rid of! Though some of the skeins are more art-yarn than knittable yarn, so they may end up being some kind of display after we move.
And that leaves 42 yarns. 26 are sock yarns so arguably they could just be socks. 19 are lace or light fingering, so I see a number of scarves in my future. All of these are yarns that I just love, though. Either the colours or the memory of where they came from.
This also means that I know what's in my stash now, and there's nothing that I wouldn't be happy to make into a garment, accessory, etc, and wear.
Wednesday, 2 August 2017
Spinning - Tour de Fleece 2017
I've done lots of spinning for the "Tour de Fleece" this year!
I've spun 4 different yarns totaling 843 yards and 425g over the 23 days of the cycle race. Like the riders, I've had a couple of rest days - I couldn't spin when I visited my parents, and I didn't have time to spin when I went out with the girls one evening.
My first spin was this lovely Alchemy Fibre Arts Blue Faced Leicester, 125g of lovely fluffiness!
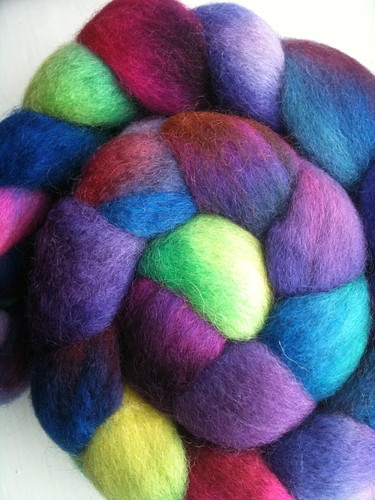
I split it pretty much in half, though not measuring or weighing it at all; then I spun it onto two bobbins and then 2-plied it.
A lot of the blue ran when I washed the yarn - it took three soaks to get it running clear, and still the drips were a bit blue when I drip dried it! This yarn was whacked to finish before hanging dry unweighted.
Then I moved on to a Spin City batt which I've been looking forwards to spinning. I've previously spun a batt from Spin City and I loved the resulting yarn, in fact I turned it into a scarf.
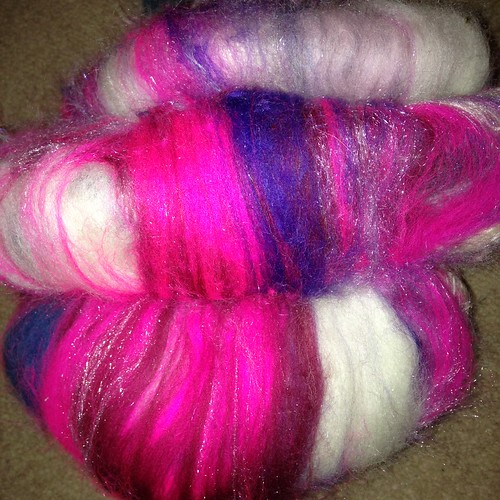
So I was excited to spin this one too, and it lived up to my hopes! I found the vegan "silk" a bit slippery, as you'd expect, but it is beautiful and pink and sparkly. I actually let the singles rest for this one, and I spun the gradient yarn in between.
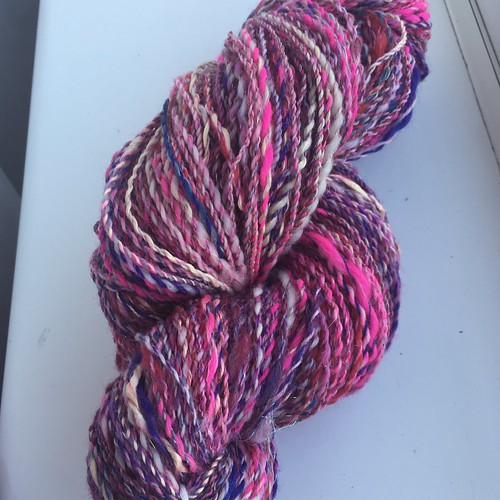
My third fluff was a pack from Nunoco. I'm pretty sure I picked it up from Etsy when I was ordering a gift for a friend (as you do) and it was simply 5 lots of 20g of merino. So simple that I forgot to photograph it before I spun it.
I split each 20g strip into four, then I spun two of each in order onto two bobbins. This meant I had tow similar singles. There was a slight difference in the lengths of the colour repeats (a combination of uneven splitting of the fibre, and uneven spinning)
The beauty of this is that the colour changes blend really well.
I was left with a longish section of just the darker colour, which I wound onto my Andean plying tool and finished off that way. I'm pleased with the resulting yarn.
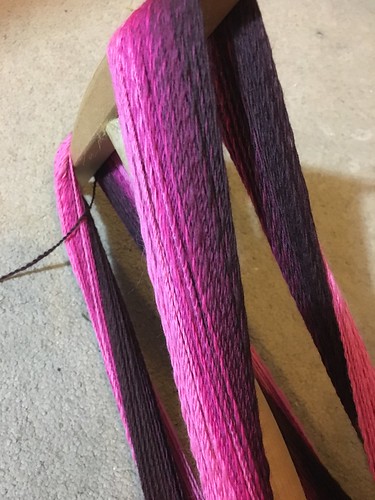
It's shown here on the niddy noddy because this is a better representation of the colours than the skeined picture.
I finished plying the Spin City batt, and the gradient on the 18th - 5 days remained of the Tour de France. I could have stopped, but I thought I'd give it a go and see if I could get something else spun before the end. I grabbed the nearest fibre from my box in the garage, and it turned out to be...
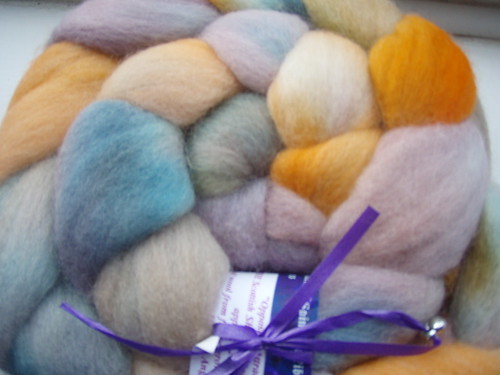
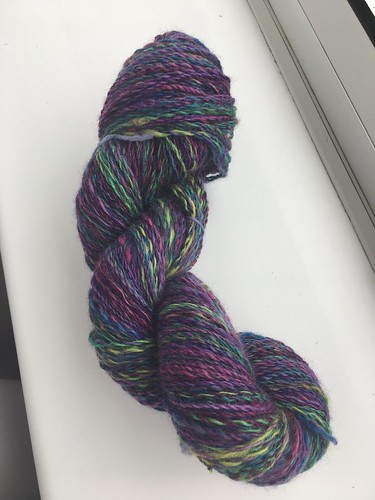
Some My Heart Exposed (I'm sorry, she doesn't trade anymore) hand-dyed Shetland. The colourway is called "Opposites Attract". I'm pleased that this was what my hand fell upon, it has spun up nicely. It's not colours I'd usually choose, but it's very pretty.
In order to keep the colours pure, I decided to n-ply this one.
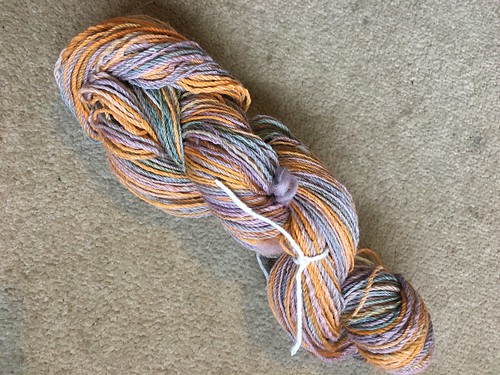
This yarn is so far out of my usual colour palette, I'm not sure what I'll do with it. It's very pretty though.
So, that's it. I finished plying the final skein on the same day that the tour concluded (though I washed it on the Monday!) and while four skeins isn't breaking any records, I'm really proud of both the amount and quality of the spinning I did this year.
Here's my final photo for the event:
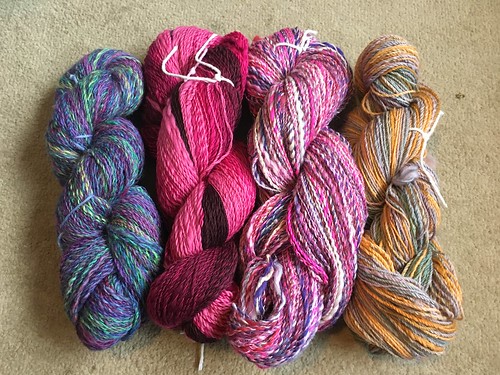
I've spun 4 different yarns totaling 843 yards and 425g over the 23 days of the cycle race. Like the riders, I've had a couple of rest days - I couldn't spin when I visited my parents, and I didn't have time to spin when I went out with the girls one evening.
My first spin was this lovely Alchemy Fibre Arts Blue Faced Leicester, 125g of lovely fluffiness!
I split it pretty much in half, though not measuring or weighing it at all; then I spun it onto two bobbins and then 2-plied it.
A lot of the blue ran when I washed the yarn - it took three soaks to get it running clear, and still the drips were a bit blue when I drip dried it! This yarn was whacked to finish before hanging dry unweighted.

Then I moved on to a Spin City batt which I've been looking forwards to spinning. I've previously spun a batt from Spin City and I loved the resulting yarn, in fact I turned it into a scarf.

So I was excited to spin this one too, and it lived up to my hopes! I found the vegan "silk" a bit slippery, as you'd expect, but it is beautiful and pink and sparkly. I actually let the singles rest for this one, and I spun the gradient yarn in between.

My third fluff was a pack from Nunoco. I'm pretty sure I picked it up from Etsy when I was ordering a gift for a friend (as you do) and it was simply 5 lots of 20g of merino. So simple that I forgot to photograph it before I spun it.
I split each 20g strip into four, then I spun two of each in order onto two bobbins. This meant I had tow similar singles. There was a slight difference in the lengths of the colour repeats (a combination of uneven splitting of the fibre, and uneven spinning)
The beauty of this is that the colour changes blend really well.
I was left with a longish section of just the darker colour, which I wound onto my Andean plying tool and finished off that way. I'm pleased with the resulting yarn.

It's shown here on the niddy noddy because this is a better representation of the colours than the skeined picture.
I finished plying the Spin City batt, and the gradient on the 18th - 5 days remained of the Tour de France. I could have stopped, but I thought I'd give it a go and see if I could get something else spun before the end. I grabbed the nearest fibre from my box in the garage, and it turned out to be...

Some My Heart Exposed (I'm sorry, she doesn't trade anymore) hand-dyed Shetland. The colourway is called "Opposites Attract". I'm pleased that this was what my hand fell upon, it has spun up nicely. It's not colours I'd usually choose, but it's very pretty.
In order to keep the colours pure, I decided to n-ply this one.

This yarn is so far out of my usual colour palette, I'm not sure what I'll do with it. It's very pretty though.
So, that's it. I finished plying the final skein on the same day that the tour concluded (though I washed it on the Monday!) and while four skeins isn't breaking any records, I'm really proud of both the amount and quality of the spinning I did this year.
Here's my final photo for the event:
Friday, 21 July 2017
Knitting - Citron
Pattern: Citron (knitty link)
Yarn: Rowan Kidsilk Haze in Wicked (Black)
Needle: 4.5mm?
Modifications:
I'm not sure what happened, but I may have used two different sized needles on this. It doesn't show though!
Verdict: I don't think I'll EVER knit this pattern in black Kidsilk again. It was hard! But, I am really pleased with the outcome, and so was the recipient! She wore it for all of the birthday celebration, which is really all I could ask for as a knitter. She used to knit too, so she knows how much work goes into a shawl like that. Everyone was suitably impressed.
Yarn: Rowan Kidsilk Haze in Wicked (Black)
Needle: 4.5mm?
Modifications:
I'm not sure what happened, but I may have used two different sized needles on this. It doesn't show though!
Verdict: I don't think I'll EVER knit this pattern in black Kidsilk again. It was hard! But, I am really pleased with the outcome, and so was the recipient! She wore it for all of the birthday celebration, which is really all I could ask for as a knitter. She used to knit too, so she knows how much work goes into a shawl like that. Everyone was suitably impressed.
Tuesday, 2 May 2017
"Me Made May 2017"
Me Made May? What is it? It's a challenge, defined by the participant, regarding their handmade wardrobe.
I've made quite a few garments, but certainly not enough to wear an item I've made every day! From looking back over this blog I can see that I have made 9 garments.
- The blue wrap dress that I made just after having my baby was adjusted a while ago to improve the fit after I lost a bit of weight. I may be able to wear that for work.
- The plaid shorts are currently in the naughty pile, I'm not happy with them, but I'm not sure what to do to fix them.
- The reversible bucket hat should be going on holiday with me, so that should get some wear.
- The Jumpsuit, short version - just no. I am making a trouser version of this for my holiday though.
- The 1 hour top needs an adjustment to be comfortable, I think I can put a dart in the armhole to make it less gappy.
- I'm actually wearing the draped top today!
- The knit mini dress (brown) is nice, I've worn it for work before, and I will again
- The pink floral dress is a bit more formal, and also is a bit loose now that I've lost weight. I'm not sure what I'm doing with this one.
- The knit mini dress (black/white) is another nice one for work. I'll probably wear this again too.
So, what's my pledge for Me Made May 2017?
- Wear a garment or use an accessory that I have made, refashioned or upcycled, three times a week throughout May
- For all of the items listed above: wear, change, reclaim fabric from, or donate to the rag bag at some point in May.
Monday, 3 April 2017
Sewing - Simplicity 1413 toddler hat
I wanted a bigger sized hat than the previous two toddler hats I have made, and I don't currently have a printer so I needed a paper pattern. I noticed that 1413 had a bucket hat as part of the pattern in the next size up...
I had two fat-quarters of the dinosaur fabric left, so I set to work with that. I made the smaller size, 19" circumference as printed. I didn't really follow the instructions though, but it still came out okay!
Sewing - Simplicity 1716 knit mini-dress, tunic and top - version 2
I've made Simplicity 1716 again!
It's such an easy make, even with sleeves this view is only 5 pieces, so it's quick to cut out and quick to sew as well.
Modifications and Adjustments
I graded out the hips to a size larger than the rest of the dress. I made the 14, grading to a 16 at the hip. I'm glad I did as this fabric drapes differently to the brown I used before. I cut the sleeves on the lengthen-shorten line rather than cutting the 3/4 or full length versions, and then hemmed them so they sit just above my elbow. This time I didn't worry about using a stretch-stitch. I did twin lines of stitching around the hems.
Verdict
I love it again! It's a nice, easy-to-wear shape and length. Overall I'm pleased with it and I would make it again. I'm thinking about making the twist-front version, though that's a few more pattern pieces and would probably work well in a plain colour.
It's such an easy make, even with sleeves this view is only 5 pieces, so it's quick to cut out and quick to sew as well.
Modifications and Adjustments
I graded out the hips to a size larger than the rest of the dress. I made the 14, grading to a 16 at the hip. I'm glad I did as this fabric drapes differently to the brown I used before. I cut the sleeves on the lengthen-shorten line rather than cutting the 3/4 or full length versions, and then hemmed them so they sit just above my elbow. This time I didn't worry about using a stretch-stitch. I did twin lines of stitching around the hems.
Verdict
I love it again! It's a nice, easy-to-wear shape and length. Overall I'm pleased with it and I would make it again. I'm thinking about making the twist-front version, though that's a few more pattern pieces and would probably work well in a plain colour.
Friday, 10 March 2017
Knitting - 21 Color Slouch
Pattern: 21 Color Slouch by Virginia Sattler-Reimer
Yarn: Blue Sky Fibers Woolstok, all 21 colours
Mods: Towards the end I had to fudge some of the colours as I ran short - my gauge must have been slightly out (I didn't measure gauge, naughty) or something. Otherwise I knit exactly as written, which is virtually unheard of for me!
Verdict: I really like it. Even weaving in ALL OF THE ENDS wasn't too much of a chore. I haven't actually blocked it yet, and it's a great size/shape, so I think I'll maybe lightly block it. I was too excited to wear it though!

As I was knitting it I was a little disappointed with the contrast between some of the colours. If I were to do it again I might shuffle the colours round a little bit to avoid putting the burgundy and red together, for example.
Yarn: Blue Sky Fibers Woolstok, all 21 colours
Mods: Towards the end I had to fudge some of the colours as I ran short - my gauge must have been slightly out (I didn't measure gauge, naughty) or something. Otherwise I knit exactly as written, which is virtually unheard of for me!
Verdict: I really like it. Even weaving in ALL OF THE ENDS wasn't too much of a chore. I haven't actually blocked it yet, and it's a great size/shape, so I think I'll maybe lightly block it. I was too excited to wear it though!

As I was knitting it I was a little disappointed with the contrast between some of the colours. If I were to do it again I might shuffle the colours round a little bit to avoid putting the burgundy and red together, for example.
Wednesday, 1 March 2017
Knitting - Wilhelm Tell Icelandic Yoke Sweater
Pattern: Wilhelm Tell Icelandic Yoke Sweater (Ravelry Link)
Yarn: Sublime Yarns Baby Cashmere Merino Silk DK [Nutkin (3), Toot (2), Plum Pie (1), Ruffles (1)]
Needle: 4mm
Mods: The gauge for the pattern is 20.5 stitches for 4". Using 4mm needles I was getting 22 stitches for 4" which is the recommended gauge for the yarn. I liked the fabric I was getting at that gauge, so I decided to go with it. I don't think the jumper would stand up to much wear at a looser gauge.
I knitted to the length of an existing cardigan, but then kiddo had a growth spurt. I initially thought it would be okay, but after having to add 2" to the sleeves, I added the same to the waistband as well. I decided just to extend the green ribbing rather than try to pull back, mainly because of the time it would take.
Verdict: I like the sweater, and I'd consider knitting something like this again. However, the speed I knit means that it takes a while, so perhaps I'll wait til she isn't growing quite so quickly!
Yarn: Sublime Yarns Baby Cashmere Merino Silk DK [Nutkin (3), Toot (2), Plum Pie (1), Ruffles (1)]
Needle: 4mm
Mods: The gauge for the pattern is 20.5 stitches for 4". Using 4mm needles I was getting 22 stitches for 4" which is the recommended gauge for the yarn. I liked the fabric I was getting at that gauge, so I decided to go with it. I don't think the jumper would stand up to much wear at a looser gauge.
I knitted to the length of an existing cardigan, but then kiddo had a growth spurt. I initially thought it would be okay, but after having to add 2" to the sleeves, I added the same to the waistband as well. I decided just to extend the green ribbing rather than try to pull back, mainly because of the time it would take.
Verdict: I like the sweater, and I'd consider knitting something like this again. However, the speed I knit means that it takes a while, so perhaps I'll wait til she isn't growing quite so quickly!
Tuesday, 28 February 2017
Knitting - Whisper
Whisper Cardigan by Hannah Fettig (Ravelry Link)
Yarn: Fyberspates Angora Wool Lace (Olive, discontinued)
Needle: 3.5 & 4.5mm
Modifications: I cast on both sleeves and worked them two-at-a-time until I reached the center back, then I grafted them together using kitchener stitch.
Verdict:
I'm really pleased with this - it looks almost the same as the one in the Interweave picture! The yarn was lovely to work with, and I love the subtle variation of colour throughout. I'm pleased I went to the trouble to make my modification, the sleeves match one another well and sit nicely.
Yarn: Fyberspates Angora Wool Lace (Olive, discontinued)
Needle: 3.5 & 4.5mm
Modifications: I cast on both sleeves and worked them two-at-a-time until I reached the center back, then I grafted them together using kitchener stitch.
Verdict:
I'm really pleased with this - it looks almost the same as the one in the Interweave picture! The yarn was lovely to work with, and I love the subtle variation of colour throughout. I'm pleased I went to the trouble to make my modification, the sleeves match one another well and sit nicely.
Friday, 6 January 2017
Knitting - Project Peace
Pattern: Project Peace - Ravelry Link - Project Peace introductory blog post.
Yarn: 408 yards of Handspun merino/silk from Freyalyn, approx 4ply weight
Needles: 3.5mm
Modifications: I did a crocheted cast on and a regular bind-off. I did more repeats than called for to use up my handspun.
Verdict: I like it. It's come out a good size for wearing, and it's soft too. The pattern was easy to work from memory once I got going. I didn't manage to knit a full repeat every day of the peace-along, but I finished it before the end of the year.
Yarn: 408 yards of Handspun merino/silk from Freyalyn, approx 4ply weight
Needles: 3.5mm
Modifications: I did a crocheted cast on and a regular bind-off. I did more repeats than called for to use up my handspun.
Verdict: I like it. It's come out a good size for wearing, and it's soft too. The pattern was easy to work from memory once I got going. I didn't manage to knit a full repeat every day of the peace-along, but I finished it before the end of the year.
Friday, 2 December 2016
Knitting - Marianna's Toddler Mitts
Pattern: Marianna's Toddler Mitts
Yarn: Fyberspates Space Dyed Sock Yarn, Fiesta, 1 skein (approx 328 yards) - I used less than a quarter of the skein.
Needle: 4mm
I don't generally like knitting flat, but these little mittens were a nice quick knit!
Modifications:
I knitted an extra two rows before starting the thumb shaping, an extra two rows in the thumb. and an extra two rows in the palm before decreasing
Verdict:
These are very cute, but they only just fit my 2 year old even with my adjustments. She has quite long fingers I guess!
Yarn: Fyberspates Space Dyed Sock Yarn, Fiesta, 1 skein (approx 328 yards) - I used less than a quarter of the skein.
Needle: 4mm
I don't generally like knitting flat, but these little mittens were a nice quick knit!
Modifications:
I knitted an extra two rows before starting the thumb shaping, an extra two rows in the thumb. and an extra two rows in the palm before decreasing
Verdict:
These are very cute, but they only just fit my 2 year old even with my adjustments. She has quite long fingers I guess!
Wednesday, 16 November 2016
Knitting - Lady's Work Mittens by Sarah Bradberry
Pattern: Lady's Work Mittens by Sarah Bradberry
Yarn: Fyberspates Space Dyed Sock Yarn, Fiesta, 1 skein (approx 328 yards) - I used less than half the skein.
Needle: 3.5mm and 4mm
This yarn was part of a multi-buy I picked up ages ago, but then sold on in a destash to a friend of mine. That friend has sadly died and when her fiance was sorting out her stash I reclaimed it. The start of the yarn was a bit kinky, as though she'd already started something with it, but then re-wound it.
Anyway, the weather got cold here, and I had no mittens. I have some gloves, but I've been meaning to make myself some mittens for a while. I've always wanted some flip-top mittens!
Modifications and Adjustments:
I'm really pleased with these. My little girl has asked for some, though I think I'll make her just regular mittens if I do. They fit me really nicely, which is unusual as I normally make mittens for myself too small and end up giving them away!
Yarn: Fyberspates Space Dyed Sock Yarn, Fiesta, 1 skein (approx 328 yards) - I used less than half the skein.
Needle: 3.5mm and 4mm
This yarn was part of a multi-buy I picked up ages ago, but then sold on in a destash to a friend of mine. That friend has sadly died and when her fiance was sorting out her stash I reclaimed it. The start of the yarn was a bit kinky, as though she'd already started something with it, but then re-wound it.
Anyway, the weather got cold here, and I had no mittens. I have some gloves, but I've been meaning to make myself some mittens for a while. I've always wanted some flip-top mittens!
Modifications and Adjustments:
- I didn't cast off at the gap, I moved the stitches onto a holder. I then did a provisional cast-on for the other side of the gap. Then I was able to pick up the live stitches to work the ribbing.
- I only picked up 19 stitches (not 20) for the ribbing, so that I could have both ends worked as knit on the outside, to make it look neater.
- I also did provisional cast on for the extra stitches for the thumb.
- I worked an extra round of decreases on the fingers, giving me a little bit more length.
- I ignored the number of rows for the thumb and just knitted til they were long enough.
- I made the mittens two-at-a-time
I'm really pleased with these. My little girl has asked for some, though I think I'll make her just regular mittens if I do. They fit me really nicely, which is unusual as I normally make mittens for myself too small and end up giving them away!
Tuesday, 25 October 2016
Sewing - New Look 6242
New Look 6242 Misses corset top with variations, Wide leg pants or full skirt
I like dressing up, and I like making my own costumes. We were invited to a 1980s themed fancy dress party and having looked at my options I decided that I was going to be the Princess of Power! But then I found out that the birthday girl was going to be She-Ra, so I switched out to Tinkerbell.
Fortunately I could still use the same corset pattern, just adding a skirt part to it as part of the construction. This posed a few challenges, as did my choice of fabric, a shiny top-layer to the dress over poly-cotton and a cotton lining.
The shiny top-fabric was very challenging to work with, it split easily, and frayed badly. It also pulled threads very easily when sewing (I should probably have switched out to a sharper needle). I also had some trouble with the invisible zip, due to the splitty fabric. It worked out fine in the end though.
The New Look pattern was well written though, I knew exactly what it wanted me to do at each stage. Since this was my first time boning a corset I appreciated the detailed instructions. I traced off the corset patterns and then lengthened them all based on the waist-line to skirt length. I left the bottom of the skirt straight to begin with.
Once I'd sewn everything together, I drew a zig-zag hem on the bottom, sewed that, and then trimmed off the excess fabric so that the points could be pressed out.
One set of inexpensive wings and some sparkly shoes later, and viola!
Modifications
Other than lengthening the pattern pieces and then adding the zig-zag edging, the only major modification I made was that I did boning on the front center, front side, and side panels, and put the zip in the back. I understand why the pattern has it in the side though. I also ended up putting a dart in the top of both side panels so that the dress sat flush with my chest instead of sticking out. If I had made a muslin I would have known to reduce the side panels accordingly.
If I were to make it again
I don't like the shape of the front center piece, I'm not sure if it was my wonky sewing though! It seemed to bow upwards rather than running straight across.
I think I could make this pattern again quite happily, though I don't have a lot of call for wearing corsets these days! I might make the She-Ra version I was planning, as I could wear it to York Comicon next year.
I like dressing up, and I like making my own costumes. We were invited to a 1980s themed fancy dress party and having looked at my options I decided that I was going to be the Princess of Power! But then I found out that the birthday girl was going to be She-Ra, so I switched out to Tinkerbell.
Fortunately I could still use the same corset pattern, just adding a skirt part to it as part of the construction. This posed a few challenges, as did my choice of fabric, a shiny top-layer to the dress over poly-cotton and a cotton lining.
The shiny top-fabric was very challenging to work with, it split easily, and frayed badly. It also pulled threads very easily when sewing (I should probably have switched out to a sharper needle). I also had some trouble with the invisible zip, due to the splitty fabric. It worked out fine in the end though.
The New Look pattern was well written though, I knew exactly what it wanted me to do at each stage. Since this was my first time boning a corset I appreciated the detailed instructions. I traced off the corset patterns and then lengthened them all based on the waist-line to skirt length. I left the bottom of the skirt straight to begin with.
Once I'd sewn everything together, I drew a zig-zag hem on the bottom, sewed that, and then trimmed off the excess fabric so that the points could be pressed out.
One set of inexpensive wings and some sparkly shoes later, and viola!
Modifications
Other than lengthening the pattern pieces and then adding the zig-zag edging, the only major modification I made was that I did boning on the front center, front side, and side panels, and put the zip in the back. I understand why the pattern has it in the side though. I also ended up putting a dart in the top of both side panels so that the dress sat flush with my chest instead of sticking out. If I had made a muslin I would have known to reduce the side panels accordingly.
If I were to make it again
I don't like the shape of the front center piece, I'm not sure if it was my wonky sewing though! It seemed to bow upwards rather than running straight across.
I think I could make this pattern again quite happily, though I don't have a lot of call for wearing corsets these days! I might make the She-Ra version I was planning, as I could wear it to York Comicon next year.
Friday, 21 October 2016
Knitting - Hubby's giant yellow scarf
Pattern: Made up as I went
Yarn: Home Farm Wensleydales "Big Wool" in Amber
Needle: 9mm
Size: About 8" wide and 6+ feet
What I did:
Hubby requested a chunky scarf to go with his navy overcoat for winter, and said he was open to having an interesting colour. I found the Home Farm Wensleydales stand at the British Wool show in York, and they had the perfect chunky yarn in the perfect yellow.
We browsed for a pattern which he liked, but most of the patterns he chose were for lighter weight yarns, so I took those as inspiration and charted a 6-strand cable. After I knitted the first repeat I got hubby's feedback, and he was concerned it was too wide. So, I started again with a narrower cable, a bit more garter stitch, and a nice fast knit!
I realised quite early on that the three balls of yarn wouldn't be enough for the length of scarf that I wanted, so I got in touch with the owner of HFW who confirmed that they had some of the same dyelot left, and that she'd be happy to send me some. Resisting the temptation to buy lots more of their yarn (it's seriously scrumptious!) I ordered just one more ball.
Verdict: I love it. He loves it. It's going to be super warm!
If you like this pattern, it's available in my Ravelry Store.
Yarn: Home Farm Wensleydales "Big Wool" in Amber
Needle: 9mm
Size: About 8" wide and 6+ feet
What I did:
Hubby requested a chunky scarf to go with his navy overcoat for winter, and said he was open to having an interesting colour. I found the Home Farm Wensleydales stand at the British Wool show in York, and they had the perfect chunky yarn in the perfect yellow.
We browsed for a pattern which he liked, but most of the patterns he chose were for lighter weight yarns, so I took those as inspiration and charted a 6-strand cable. After I knitted the first repeat I got hubby's feedback, and he was concerned it was too wide. So, I started again with a narrower cable, a bit more garter stitch, and a nice fast knit!
I realised quite early on that the three balls of yarn wouldn't be enough for the length of scarf that I wanted, so I got in touch with the owner of HFW who confirmed that they had some of the same dyelot left, and that she'd be happy to send me some. Resisting the temptation to buy lots more of their yarn (it's seriously scrumptious!) I ordered just one more ball.
Verdict: I love it. He loves it. It's going to be super warm!
If you like this pattern, it's available in my Ravelry Store.
Sunday, 11 September 2016
Knitting - Gradient Socks
Pattern: Basic sock pattern, twisted rib cuff, genuine afterthought heel.
Yarn: My hand-dyed gradient 4ply, approx 100g.
Needle: 2.5mm
After I dyed the gradient red/cream sock yarn, I couldn't wait to start knitting with it! So, I dug out a pair of 2.5mm circulars out, and cast on! I decided to put the darker red at the bottom as it would hopefully hold up better to wear and general grubbiness that socks have to deal with.
This was the first time I have done an actual afterthought heel. Normally I leave a line of contrasting yarn where I intend to put the heel, but as I didn't know exactly how long I was going to knit these socks (I wanted to use the whole gradient!) I had to do it properly.
Once I had finished the main sock body, I decided where the heel needed to be based on that.
Since I'm a bit of a stickler for my socks matching, I counted the number of rows so that I could replicate it for the second sock.
Yarn Harlot describes how to do the afterthought heel much more eloquently than I could.
And there you go. Gradient socks, uninterrupted gradient, genuinely afterthought heel.

A note about afterthought heels
Afterthought heels are especially useful if you want to preserve a stripe sequence or colour flow. Normally if you work a heel in a self-striping yarn as part of the knitting of the body of the sock you get an interruption to the stripes where the heel takes up some of the stripes. You can see this on the below picture where the brown stripes narrow over the top of the foot where the heel has been worked.
So, to avoid this, if you knit the heel afterwards you can be sure to preserve the stripes. The other way is to stop at the end of a stripe, knit the heel and then wind off the yarn to the next sensible place to start once the heel is done. This seems wasteful to me, and wouldn't work on a gradient like this.
Yarn: My hand-dyed gradient 4ply, approx 100g.
Needle: 2.5mm
After I dyed the gradient red/cream sock yarn, I couldn't wait to start knitting with it! So, I dug out a pair of 2.5mm circulars out, and cast on! I decided to put the darker red at the bottom as it would hopefully hold up better to wear and general grubbiness that socks have to deal with.
This was the first time I have done an actual afterthought heel. Normally I leave a line of contrasting yarn where I intend to put the heel, but as I didn't know exactly how long I was going to knit these socks (I wanted to use the whole gradient!) I had to do it properly.
Once I had finished the main sock body, I decided where the heel needed to be based on that.
Since I'm a bit of a stickler for my socks matching, I counted the number of rows so that I could replicate it for the second sock.
Yarn Harlot describes how to do the afterthought heel much more eloquently than I could.
And there you go. Gradient socks, uninterrupted gradient, genuinely afterthought heel.

A note about afterthought heels
Afterthought heels are especially useful if you want to preserve a stripe sequence or colour flow. Normally if you work a heel in a self-striping yarn as part of the knitting of the body of the sock you get an interruption to the stripes where the heel takes up some of the stripes. You can see this on the below picture where the brown stripes narrow over the top of the foot where the heel has been worked.
So, to avoid this, if you knit the heel afterwards you can be sure to preserve the stripes. The other way is to stop at the end of a stripe, knit the heel and then wind off the yarn to the next sensible place to start once the heel is done. This seems wasteful to me, and wouldn't work on a gradient like this.
Friday, 9 September 2016
Sewing - Simplicity 1458 Amazing Fit Dress
Simplicity are running a bloggers' challenge; there are four patterns and five categories in which sewists can participate.
I requested the patterns in the "newcomer" and "dressmaker" categories, in the hope that I would be able to make at least one of those successfully. I went back and checked the rules and realised that I've actually been sewing for too long to be considered a beginner! Oh well, I'm still going to make that skirt!
Aside from the excellent service I've received from Simplicity, I also find the patterns in both the New Look and Simplicity ranges to be easy to follow. I love the fact that the pattern sizes are stacked because it allows me to trace a pattern in one size at the waist, and taper out to a larger size at the hips, since I'm very much a pear shape! I didn't need to do that for this dress, though, as it comes with an option for a "curvy" bottom half!
In the dressmaker category the pattern is 1458 - Amazing Fit Dress.
I decided that I wanted something which would look interesting and fun, something I could wear to the office or to a nice event. Looking at the shapes in the pattern, I thought that using a contrast colour for the side panels could look really interesting, though it would mean that my seams would need to be matched up well! I chose pink and black because I like those colours (you might have guessed that, if you've seen my other makes!)
This has been an excellent learning project for me, as it's encompassed several firsts. I inserted my first genuinely invisible zip, I under-stitched my facings for the first time, and I used the blind hem foot to do the hem for the first time.
The fitting instructions in the patterns were very helpful, and allowed me to reduce the excess fabric both above and below my bust (I'm apparently a funny shape). I also took away a little more excess through the side seams to fit a little better at my waist/hip, tapering out to the bottom of the skirt.
I'm really pleased with the dress, I look forward to wearing it!
With hindsight, I may have made it a little more fitted across the waist/back than the pattern calls for, but with my shapewear underneath that won't be a problem.
I don't know whether I'll make another of these. The neckline is a bit higher than I would normally choose in a dress, but it does look great on. I've made this one quite fitted, so I could try a lighter or stretchier fabric and a less close fit. The option for sleeves is appealing as the autumn starts to make itself felt. The great thing about making your own clothes is that you can choose whether to make them fit closer, and exactly where to make the fit closer.
I requested the patterns in the "newcomer" and "dressmaker" categories, in the hope that I would be able to make at least one of those successfully. I went back and checked the rules and realised that I've actually been sewing for too long to be considered a beginner! Oh well, I'm still going to make that skirt!
Aside from the excellent service I've received from Simplicity, I also find the patterns in both the New Look and Simplicity ranges to be easy to follow. I love the fact that the pattern sizes are stacked because it allows me to trace a pattern in one size at the waist, and taper out to a larger size at the hips, since I'm very much a pear shape! I didn't need to do that for this dress, though, as it comes with an option for a "curvy" bottom half!
In the dressmaker category the pattern is 1458 - Amazing Fit Dress.
I decided that I wanted something which would look interesting and fun, something I could wear to the office or to a nice event. Looking at the shapes in the pattern, I thought that using a contrast colour for the side panels could look really interesting, though it would mean that my seams would need to be matched up well! I chose pink and black because I like those colours (you might have guessed that, if you've seen my other makes!)
This has been an excellent learning project for me, as it's encompassed several firsts. I inserted my first genuinely invisible zip, I under-stitched my facings for the first time, and I used the blind hem foot to do the hem for the first time.
![]() |
| Sorry about the weird pose, I was sinking into the grass with those heels! |
The fitting instructions in the patterns were very helpful, and allowed me to reduce the excess fabric both above and below my bust (I'm apparently a funny shape). I also took away a little more excess through the side seams to fit a little better at my waist/hip, tapering out to the bottom of the skirt.
I'm really pleased with the dress, I look forward to wearing it!
With hindsight, I may have made it a little more fitted across the waist/back than the pattern calls for, but with my shapewear underneath that won't be a problem.
I don't know whether I'll make another of these. The neckline is a bit higher than I would normally choose in a dress, but it does look great on. I've made this one quite fitted, so I could try a lighter or stretchier fabric and a less close fit. The option for sleeves is appealing as the autumn starts to make itself felt. The great thing about making your own clothes is that you can choose whether to make them fit closer, and exactly where to make the fit closer.
Subscribe to:
Posts (Atom)