Tuesday, 19 April 2016

Sewing - Reversible Bucket Hats!

Toddler Pattern: Free Download from the Oliver & S site
Adult Pattern: Kitsch Bitsch

Adjustments and alterations: Both patterns use basically the same method to put the hats together, with a couple of small exceptions. The toddler hat has two pieces each for the side and brim, which you are to cut out and then tape together. The Kitsch hat simply has you cut that piece on the fold, so you only need one half. If (like me) you're always looking to save paper and ink, then only print the crown and one each of the side and brim pieces, and then cut them on the fold.

Toddler Hat
I've made this hat for my little girl before. Last summer I found some cute dinosaur fabric, and I couldn't resist making her some hats from it. This summer I bought some hedgehog fabric (which is meant to be a bean-bag!) and when I decided that she needed a hat, I knew I wanted to use this fabric. It's pretty firm, so I didn't interface any of it. I basically followed the directions from the Kitsch hat to put the pieces together, still trimming the seam allowances to ¼" after sewing. I still top-stitched around the crown, and I did some top-stitching on the brim too.

Viola! A cute hedgehog bucket hat!

#naptime #sewing #hat @oliverands #buckethat I think she likes it!

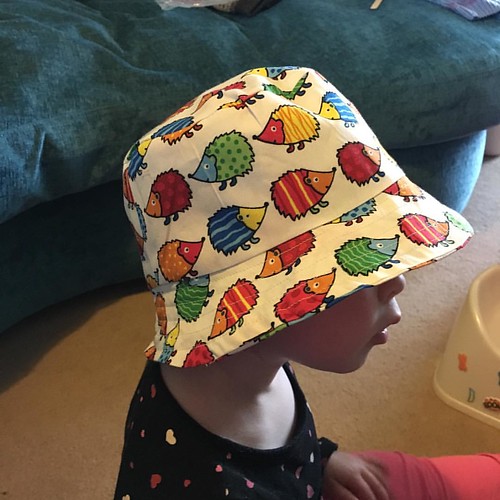
Verdict (Toddler hat):
It's really cute! Because I'd accidentally printed at 106% I've made the smallest size. It worked well for my 22 month old. It's probably not really reversible though, because I cut out the inside pieces upside-down!

Adult Hat
I had some denim left over from the jacket I've been making, and I need a hat for my holiday, so I thought I'd have a go at making myself a bucket hat. I love the way they look, but they never fit me especially well. To get a good fit, I made the "inside" hat first. That way I could make adjustments to the size of everything one the easier-to-sew cotton. Because the denim is pretty firm, I decided not to interface the brim.

Once I'd stitched the hats together, and turned them the right way in, I did a little more stitching on the adult hat than called for. I did one line of top-stitching around the crown, to help keep the two parts together, and one round of top stitching on the brim.

Despite trying on the lining, and even at the time thinking "hm, this seems a little roomy", when I tried the hat on it was too big.

Bit big? #kitschbitsch #buckethat #sewing

So, I took it apart and re-made it. If I'd had more of the denim, I'd have considered just starting fresh. The main thing I did was switch to the smaller pattern size. I also reduced the height of the sides by about ½". I didn't top-stitch around the crown this time, but I did several concentric rows of stitching on the brim which gives it a bit more firmness.

Much better! #sewing #buckethat #kitschbitsch #reconstructed - now I just need to top stitch the brim and it's done!

Viola! a reversible bucket hat for my holiday!

Verdict (Adult hat):
I like it. I think the pattern as written might be a little tall for my liking, but because there isn't a square to confirm my sizing, it is possible that I simply printed it too big. That would explain why the small has been the right size when I thought it would be too small.

Untitled

Saturday, 2 April 2016

Crochet - Piquant

Yarn: Schoppel-Wolle Lace Ball (90% of a ball)
Hook: 4.5mm
Mods: I used laceweight where the pattern called for 4ply/sock. I made more repeats than the smaller size, but fewer than the larger size.
Verdict: I love it!

Zauberball lace

I love the Zauberball yarn by Schoppel-Wolle, so how could I resist the lace weight of the same type. It has amazing long repeats of colour which provide the opportunity for some creative projects.

The pattern is worked in 3 parts, the band, the edges, and then the center is "filled in".
The edging was difficult, but well worth it. The rest of the pattern was pretty easy, and a great TV or travelling project. 

Piquant

I'm really pleased with it. It's lovely to wear, and looks really intricate. I've already had comments on how fab it looks.

Piquant

Friday, 1 April 2016

Spinning - BFL/Jacob

On May 1st-3rd 2015 there was a cycling event near me, the inaugural "Tour de Yorkshire". We went out to see the riders pass through Wetwang, and then caught them again just before Stamford Bridge. It was great fun, and I hope it keeps going!

Anyway, in honour of this I started some spinning. Like with the Tour de Fleece (more on that later) I aimed to spin on every day they cycled. I got something like 75% through the Jacob part of the fibre I have.

So, let me tell you about the fibre. I bought it from Fibre East last year, from the Sara's Texture Crafts stand. (She has an Etsy store, but be warned the stuff she sells is glorious!)


I decided that I was going to spin each fibre separately, and then ply them together. While this meant that I ended up with a bit leftover of the BFL, I tried it because I hoped that the yarn would be pretty.

The Jacob has a shorter staple than I'm used to, but once I got going it was pretty fun to spin. It's come out a kind of tweedy grey on the bobbin. (shown below on the right)

Ready to #ply

The BFL was, of course, a joy to spin. It's one of my favourite fibres, being a longish staple and lustrous too, it's easy to feel like a spinning champion when I'm spinning BFL. I tried to spin the same sort of grist as for the Jacob; I think I managed it most of the time.

Done! #spinning #yarn


Having let the Jacob sit for almost a year (crikey!) plying was difficult because it was almost impossible to know if the yarn was balanced. In the end I opted for a generic amount of twist with the hope that it would even out.

It's not really this green, and needs a wash and whack. #spinning


So, it's not quite so green as in that picture, early morning light in the winter made it look a bit funny. You can see, though, that some areas are a bit under-spun and under-plied. It's not too bad, but I think I should have spun it with a bit more twist, and then plied with a bit more twist too. I'm also not as keen on spinning 2-ply yarns, I like the shape and texture of the N-ply best. But, this 2ply will be much nicer for knitting something a bit soft. It wouldn't be ideal for a scarf because the Jacob is a bit scratchy. I'll have to think about what it might be good for.

Overall the yarn isn't as pretty as I'd hoped, but it's nice enough.

Details:
approx 309 yards of 2ply fingering weight (ish) yarn, Z spun and S plied on an Ashford Traveller, standard maiden, middle whorl.

Just a final note about the Tour de Fleece. It runs (on Ravelry) at the same time as the Tour de France, which this year is the 4th July to the 26th July. It also happens off Ravelry on various crafty blogs, so watch out for that! I'll be taking part, hopefully I'll be in the peloton! I aim to spin on every day the riders ride. I'm not trying to sprint (spinning a lot of yarn) or win the King of the Mountains (spinning something hard, a personal challenge).

Tuesday, 29 March 2016

Sewing - Mini Quilt

I took part in a mini-quilt swap recently. I've had to wait to post until the recipient confirmed receipt of the quilt, but now she has it, here it is!

#ravwedsquiltswap mini quilt plotting #quilting #quiltersofinstagram #planner #cathedralwindowsquilt

I used the cathedral windows ironing method.

What that means is that I made 25 large squares, fold the corners in to the centre, press, fold the corners again, press again, then sew together in strips.

I ordered a set of pre-cut squares to fill the windows with, in a rainbow pack. I then planned out the squares to progress in a pattern from red to violet, approximately.

Once this was ready, I hand sewed the windows themselves, including the edge windows which do not have anything in them. I also sewed the points together. Had I thought about it, I would have sewn the windows in such a way that I could have used the ends to sew the points together, but I didn't always do that, which meant more ends to weave in.

#ravwedsquiltswap #teaser #miniquilt

I'm pleased with the effect though, and my recipient likes it too, which is the most important part!

Quilt mini

Saturday, 27 February 2016

Dyeing - Sock Yarn Gradient Dye

What is a gradient yarn? There's a lot of discussion about this in the yarny world; but for the purposes of this blog, a gradient yarn is one that changes from one colour to another over the course of its length in a gradual way. Sometimes there is a third or fourth colour.

There are a number of ways to make a gradient yarn.
  1. spin one long single from two colours of fibre, blending as you go, and then n-ply it
  2. spin one long single from a dyed length of gradient fibre, and then n-ply it
  3. spin two singles using one of the above methods, and 2ply it (this could soften the blend but may also result in barber-poling)
  4. dye the yarn by splitting it into several small skeins and gradiating the amount of dye used on each skein (there are a number of ways this can be done)
  5. dye the yarn by dipping one end in one colour and the other end in another colour (this risks ending up with a quite distinct colour change)
  6. dye the yarn in a ball and a pan
I decided to try method 6 first.

The first thing I had to do was work out how much yarn I wanted. I plan on making some socks, so I weighed a pair of socks I own in a similar yarn. They were 60g, so I wound 60g of yarn from this massive ball of sock yarn I have.

Approx 1600m of 4ply sock yarn wound by hand.

Once I had that, I wound a smaller amount, around 15g, which I intend to use for afterthought heels. I'm not especially fond of the undyed colour of this yarn, it's a bit yellow.

Once I had my 60g, I set about finding the middle, which I did by winding a new ball until the existing one weighed 30g. Then I took that middle yarn and re-wound the ball two strands together. This is so that I will have two similar balls to work the socks from two-at-a-time.

I dug around in my "dye" box and found some nice food colours. I started with the red one. I put a good splash of red into the pan, added the yarn (including my heels bit) and warmed it up. I rolled the ball around every few minutes to try to get an even saturation.

Food colour, yarn, hopefully a home-made gradient. #gradient #yarndyeing #knittersofinstagram


Once it had cooled, I squeezed some of the water out and then let it dry a bit more. Since this isn't superwash, I had to be careful with it to avoid felting.

I rewound the ball in the other direction with a view to either leaving it as it was or dying from the other end in a different colour. I found that the red had split a little on the inner sections into a quite pretty shade of orange. The colour is also kind of variegated in the middle sections. I expected it would be a bit variegated, but I am surprised at how it's come out. I like it as it is though,

Dyed yarn gradient

Next I decided to try method 4. 

I hope to knit Bosc Pear (Ravelry Link) which is an asymmetric shawl/scarf. The length can be adjusted to change the size. I'm hoping to make a smallish one, so I wound off 4 lots of 25g into connected skeins. 

I then got 4 plastic cups and put food colouring in them, red in one, a mixture of red and "black" in the next, "black" and red in the third, and then "black" in the fourth.
As you might know, black food colouring isn't actually black. The one I have is green-based, so I expected that the yarn will be green rather than black on that end. I expected the middle two colours to be a mixture, probably reddish-brown and greenish-brown, but it's always a bit of an experiment!

Once they had soaked for a while (overnight), I transferred the yarn into some cling film and put it in a bowl to zap in the microwave. I don't usually do this, I usually use a steamer, but the steamer is in the garage behind a lot of other boxes, so microwave it is!

Dyed yarn gradientDyed yarn gradient

As I expected, the black separated into other colours, but it's a nice progression still from the red, through burgundy, to a greenish brown, and then to a greenish grey. I think this will make an exciting scarf!
I was a little disappointed though, the cups were not really big enough for the amount of yarn, so the red is a bit patchy. 


Thursday, 25 February 2016

Sewing - Memory Quilt


My sister asked me if I would make a memory quilt for my niece's 2nd birthday.
Despite having only made one quilt before, I agreed.

Quilts!

A short time later, my sister provided me with a massive box of baby clothes from my niece's first 3 months or so. I selected a few specific items with fun logos on. The centerpiece was to be the baby-grow with "Born in 2013" on it. My sister told me that she especially liked a baby-grow with some clouds on, so I combined those to produce a fab center square, as shown to the right.


Because the baby clothes are all made from jersey, which is stretchy, I ironed interfacing onto the back of all of the pieces before cutting them out. This has two benefits: it stops the stretching (mostly) and also means that you can draw on the seam-lines.

I made a few other combined blocks to try to produce 5 columns of approximately the same width.


Once I'd finished piecing the quilt, I had to find some nice backing fabric for it. I found this lovely poly-cotton with fun animals on, and after checking with my sister, this was deemed to be appropriate.


Quilts!

I then stitched a 1/4" seam around each block. Every single block, including the small ones. that made for a lot of ends to weave in, but it looks really nice.

I had some grey binding left over from my last quilt, so I decided that this would be a good bet for this quilt too. (I'm very fond of the Klona cotton)

I'm really pleased with how this came out, and my sister loves it too!

Quilts!

Tuesday, 23 February 2016

Sewing - My First Quilt

I have finished my first ever quilt. I decided to make this prior to making a memory quilt for my sister as I didn't want to make my beginners' mistakes on her precious baby clothes!

I bought the Gone Fishing panel from Benartex to use as the main blocks, and then cut some smaller squares from orange and grey fabric to finish the design. The back is done with the grey, and I also made my own bias binding from the grey fabric too.

Quilts!

I used a couple of tutorials to help me through this, here they are:

Piecing basics
Quilting basics
Making bias binding
Attaching bias binding with a machine

Things I've learned through this process:
1. Matching up corners of blocks is really hard! I understand why so many quilts have border strips in them now. For my sister's quilt I might think about staggering the blocks to reduce the amount of corners I need to match.
2. Quilting is quite hard too! I only did "stitch in the ditch" and it still took concentration and time!
3. Adding binding is also tough because of the layers!
4. Despite 1, 2 and 3, it's totally worth it, and addictive! I'm having to be really strict with myself about buying all the fabric for a new quilt, not to mention a new sewing machine! Ha! I'll have to console myself with some other sewing instead.

Quilts! Quilts!